之前折腾:
【记录】从fzhost搬家crifan.com到Linode的Atlanta的VPS
后,期间让LNMP自动生成SSL:
结果失败了:
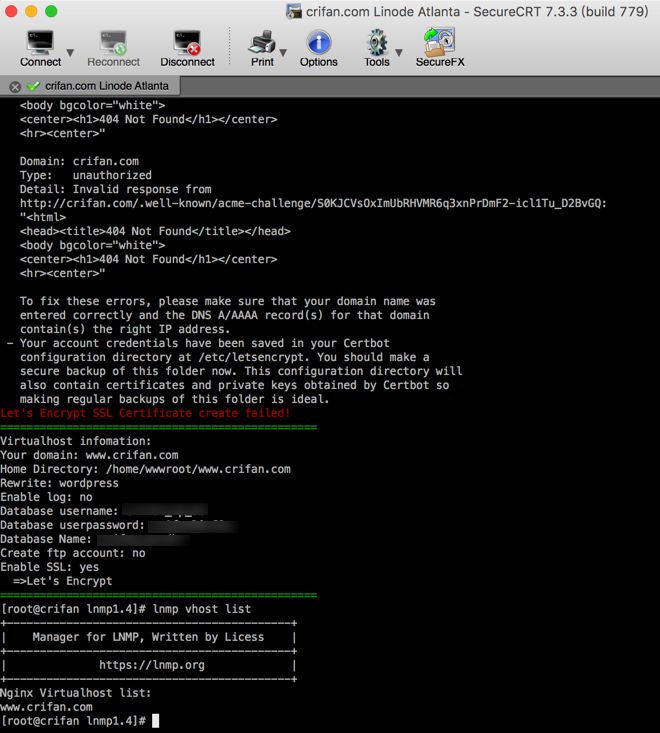
Creating virtual environment… Installing Python packages… Installation succeeded. Saving debug log to /var/log/letsencrypt/letsencrypt.log Obtaining a new certificate Performing the following challenges: http-01 challenge for www.crifan.com http-01 challenge for crifan.com Using the webroot path /home/wwwroot/www.crifan.com for all unmatched domains. Waiting for verification… Cleaning up challenges Failed authorization procedure. www.crifan.com (http-01): urn:acme:error:unauthorized :: The client lacks sufficient authorization :: Invalid response from https://www.crifan.com/.well-known/acme-challenge/4IXUqR6devmWQPYOovfuizaNddZ72FgmLQIFmtDyeKU: "<html> <head><title>404 Not Found</title></head> <body bgcolor="white"> <center><h1>404 Not Found</h1></center> <hr><center>", crifan.com (http-01): urn:acme:error:unauthorized :: The client lacks sufficient authorization :: Invalid response from https://crifan.com/.well-known/acme-challenge/S0KJCVsOxImUbRHVMR6q3xnPrDmF2-icl1Tu_D2BvGQ: "<html> <head><title>404 Not Found</title></head> <body bgcolor="white"> <center><h1>404 Not Found</h1></center> <hr><center>" IMPORTANT NOTES: – The following errors were reported by the server: Domain: www.crifan.com Type: unauthorized Detail: Invalid response from "<html> <head><title>404 Not Found</title></head> <body bgcolor="white"> <center><h1>404 Not Found</h1></center> <hr><center>" Domain: crifan.com Type: unauthorized Detail: Invalid response from "<html> <head><title>404 Not Found</title></head> <body bgcolor="white"> <center><h1>404 Not Found</h1></center> <hr><center>" To fix these errors, please make sure that your domain name was entered correctly and the DNS A/AAAA record(s) for that domain contain(s) the right IP address. – Your account credentials have been saved in your Certbot configuration directory at /etc/letsencrypt. You should make a secure backup of this folder now. This configuration directory will also contain certificates and private keys obtained by Certbot so making regular backups of this folder is ideal. Let’s Encrypt SSL Certificate create failed! ================================================ Virtualhost infomation: Your domain: www.crifan.com Home Directory: /home/wwwroot/www.crifan.com Rewrite: wordpress Enable log: no Database username: crifan_wp_db Database userpassword: xxx Database Name: crifan_wp_db Create ftp account: no Enable SSL: yes =>Let’s Encrypt ================================================ [root@crifan lnmp1.4]# |
然后现在最好还是要去解决crifan.com的https的问题的原因是:
之前网站是已经添加了https的,所以现在
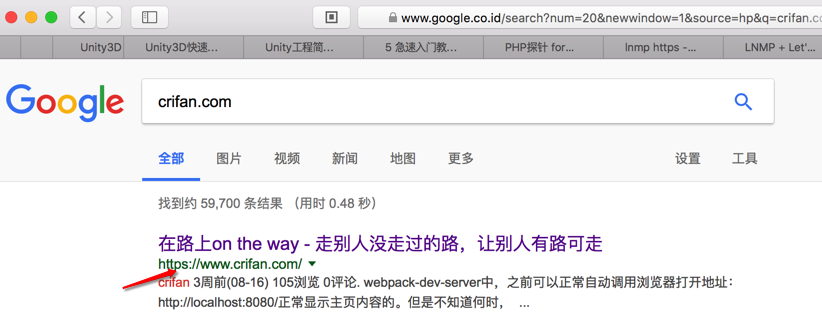
google中搜出来的帖子,都是自动跳转到https的地址了,比如:
所以如果不添加https的支持,网上很多地址,都无法打开了
-》只有我自己知道,而其他用户缺不知道,把https改为http就可以打开了。。。
看到上面错误的信息,感觉是:
之前由于还没有把域名弄过来,所以导致自动创建https的SSL证书时,去访问:
https://crifan.com/.well-known/acme-challenge/S0KJCVsOxImUbRHVMR6q3xnPrDmF2-icl1Tu_D2BvGQ
会失败,因为那时候
本身就无法打开。。。
-》所以现在可以打开的情况下,或许再去执行一遍,就可以了?
搜:
lnmp https
LNMP + Let’s Encrypt HTTPS 网站配置 – 简书
LNMP安装Let’s Encrypt 免费SSL证书方法:自动安装与手动配置Nginx | 免费资源部落
“二、LNMP自动安装Let’s Encrypt 注意地方
1、使用LNMP自动安装Let’s Encrypt ,因为涉及到要验证域名,所以请提前将你的域名解析到你的VPS主机上,这样才可以成功使用LNMP自动安装Let’s Encrypt 。”
LNMP一键包环境安装SSL安全证书且部署HTTPS网站URL过程 | 老左博客
lnmp ssl unauthorized Invalid response from
现在感觉可能有2种办法:
一是把之前fzhost中的crifan.com中的SSL证书拷贝过来,添加上去
二是重新用lnmp的ssl管理去重新自动生成SSL证书和相关配置
先去试试第二种
lnmp ssl
LNMP添加、删除虚拟主机及伪静态使用教程 – LNMP一键安装包
建议用户更新Let’sEncrypt SSL证书续期规则 – LNMP一键安装包
如果是此处重新添加SSL,正好可以避免升级的问题了。
LNMP下Nginx如何设置域名301重定向 – LNMP一键安装包
待会如果需要配置,再去参考该帖去更新配置。
LNMP V1.4一键快速部署Let’s Encrypt免费SSL证书 | 老左博客
[root@crifan www.crifan.com]# lnmp help +——————————————-+ | Manager for LNMP, Written by Licess | +——————————————-+ | https://lnmp.org | +——————————————-+ Usage: lnmp {start|stop|reload|restart|kill|status} Usage: lnmp {nginx|mysql|mariadb|php-fpm|pureftpd} {start|stop|reload|restart|kill|status} Usage: lnmp vhost {add|list|del} Usage: lnmp database {add|list|edit|del} Usage: lnmp ftp {add|list|edit|del|show} Usage: lnmp ssl add |
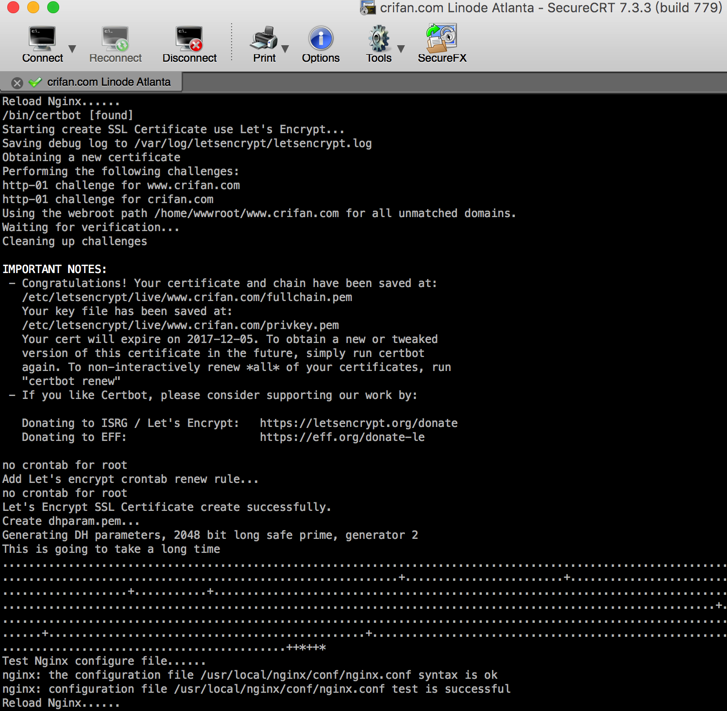
去add 这个ssl试试:
[root@crifan www.crifan.com]# lnmp ssl add +——————————————-+ | Manager for LNMP, Written by Licess | +——————————————-+ | https://lnmp.org | +——————————————-+ Please enter domain(example: www.lnmp.org):www.crifan.com Your domain: www.crifan.com domain list: crifan.com Please enter the directory for domain www.crifan.com: /home/wwwroot/www.crifan.com Allow Rewrite rule? (y/n) y Please enter the rewrite of programme, wordpress,discuz,typecho,sablog,typecho rewrite was exist. (Default rewrite: other): wordpress You choose rewrite: wordpress Allow access log? (y/n) n Disable access log. 1: Use your own SSL Certificate and Key 2: Use Let’s Encrypt to create SSL Certificate and Key Enter 1 or 2: 2 Please enter your email address: [email protected] It will be processed automatically. You select the exist rewrite rule:/usr/local/nginx/conf/wordpress.conf Test Nginx configure file…… nginx: the configuration file /usr/local/nginx/conf/nginx.conf syntax is ok nginx: configuration file /usr/local/nginx/conf/nginx.conf test is successful Reload Nginx…… /bin/certbot [found] Starting create SSL Certificate use Let’s Encrypt… Saving debug log to /var/log/letsencrypt/letsencrypt.log Obtaining a new certificate Performing the following challenges: http-01 challenge for www.crifan.com http-01 challenge for crifan.com Using the webroot path /home/wwwroot/www.crifan.com for all unmatched domains. Waiting for verification… Cleaning up challenges IMPORTANT NOTES: – Congratulations! Your certificate and chain have been saved at: /etc/letsencrypt/live/www.crifan.com/fullchain.pem Your key file has been saved at: /etc/letsencrypt/live/www.crifan.com/privkey.pem Your cert will expire on 2017-12-05. To obtain a new or tweaked version of this certificate in the future, simply run certbot again. To non-interactively renew *all* of your certificates, run "certbot renew" – If you like Certbot, please consider supporting our work by: Donating to ISRG / Let’s Encrypt: https://letsencrypt.org/donate Donating to EFF: https://eff.org/donate-le no crontab for root Add Let’s encrypt crontab renew rule… no crontab for root Let’s Encrypt SSL Certificate create successfully. Create dhparam.pem… Generating DH parameters, 2048 bit long safe prime, generator 2 This is going to take a long time ……………++*++* Test Nginx configure file…… nginx: the configuration file /usr/local/nginx/conf/nginx.conf syntax is ok nginx: configuration file /usr/local/nginx/conf/nginx.conf test is successful Reload Nginx…… |
然后貌似就可以了:
然后看看,的确有用于自动更新ssl证书的crontab了:
[root@crifan www.crifan.com]# crontab -l 0 3 */7 * * /bin/certbot renew –disable-hook-validation –renew-hook "/etc/init.d/nginx reload" |
然后再去打开https,结果就可以打开了:

且此处是
在safari中输入crifan.com自动跳转到https
但是Chrome中没有自动跳转https
所以感觉还需要再去更新nginx的配置,强制跳转https
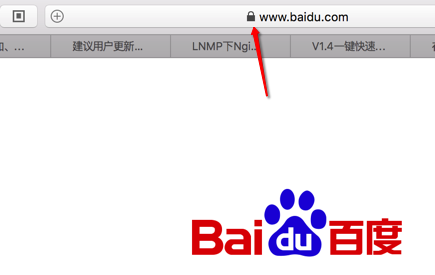
且:
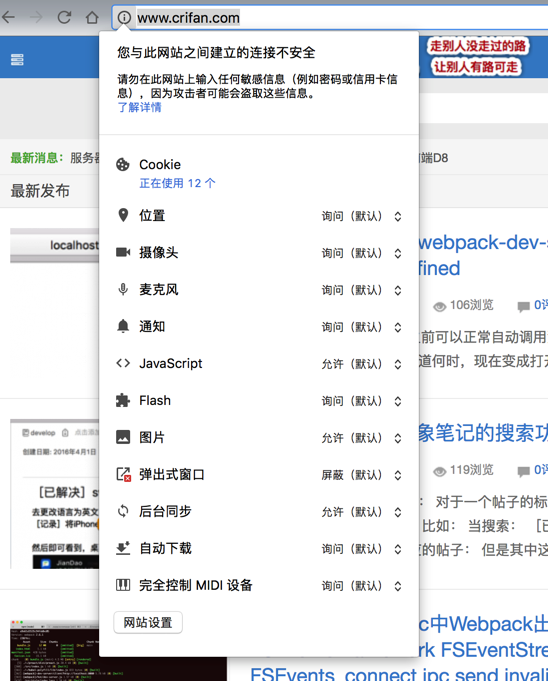
safari和Chrome中都没有显示是加了锁的安全的网站:

对应的百度则是加了锁的:
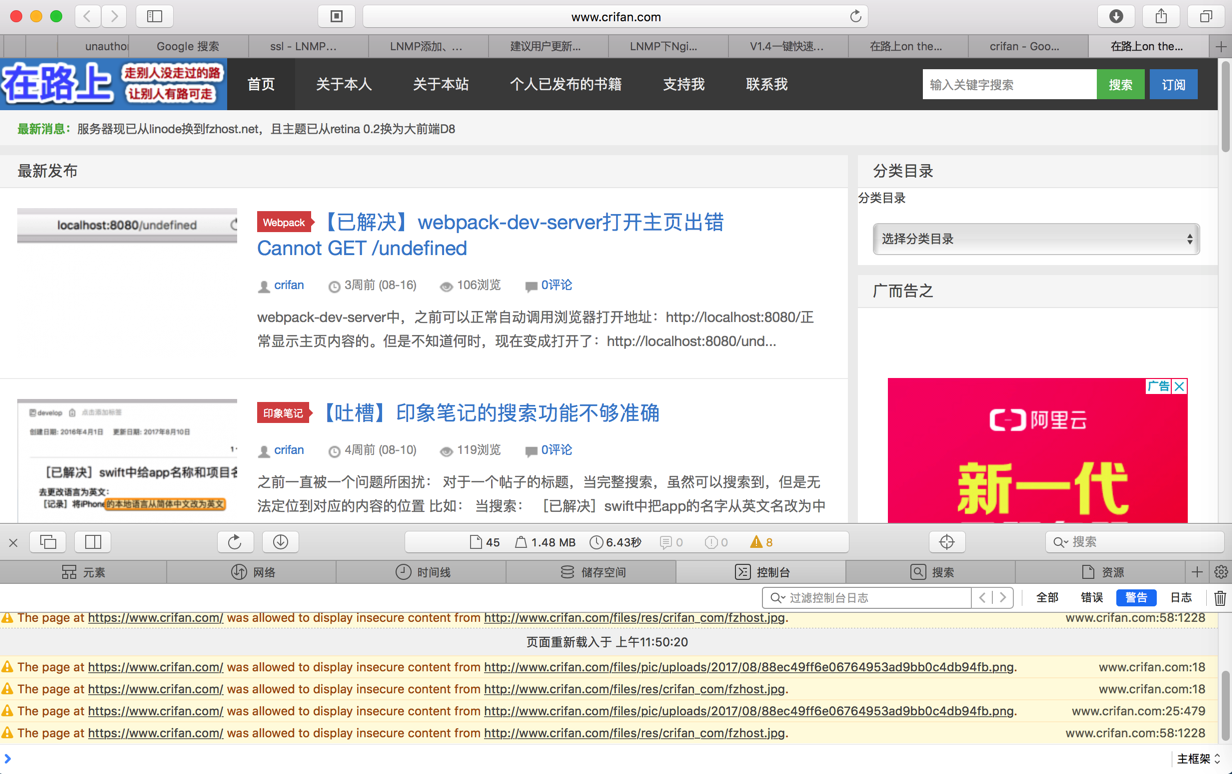
后来看到了log中的提示:

即https的网站上,部分内容还是http加载的,所以不是完全的安全的,所以没有显示🔒的图标。
去重启LNMP后再去试试
[root@crifan www.crifan.com]# lnmp restart +——————————————-+ | Manager for LNMP, Written by Licess | +——————————————-+ | https://lnmp.org | +——————————————-+ Stoping LNMP… Stoping nginx… done Shutting down MySQL.. SUCCESS! Gracefully shutting down php-fpm . done Starting LNMP… Starting nginx… done Starting MySQL.. SUCCESS! Starting php-fpm done |
然后再去浏览器中看看效果:
问题依旧:
所以看来是需要301强制把http跳转为https了。
the page at was allowed to display insecure content from
lnmp 301 https
Nginx / LNMP 部署 SSL 证书并强制 301 重定向到 HTTPS – best66
Nginx rewrite 重定向自动识别 http/https – Coxxs
http跳转“https://”LNMP的301重定向设置 | 偶乃秋辰
官网自己就介绍了:
LNMP下Nginx如何设置域名301重定向 – LNMP一键安装包
server { listen 443 ssl; server_name www.lnmp.org; 省略其他配置 } server { listen 80; server_name www.lnmp.org; return 301 https://www.lnmp.org$request_uri; } |
但是感觉有点麻烦,而这个:
LNMP V1.4一键快速部署Let’s Encrypt免费SSL证书 | 老左博客
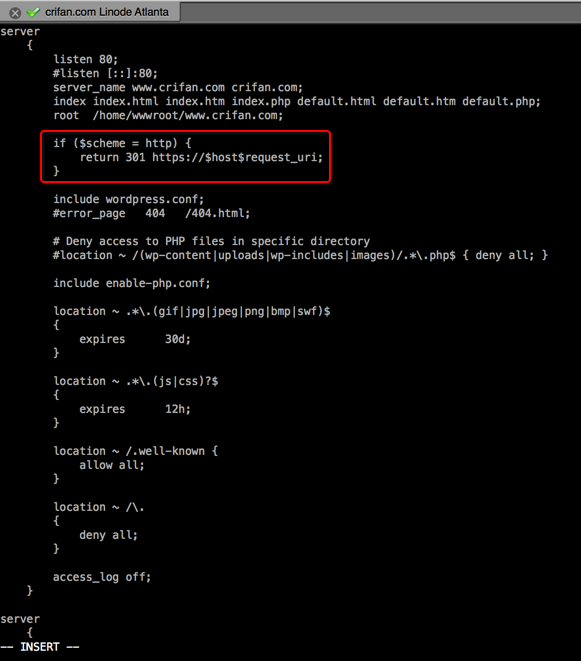
中的做法,更省事,通过判断scheme为http就301到https
if ($scheme = http ) { return 301 https://$host$request_uri; } |
另外,这里也有检测80端口的去301的:
LNMP + Let’s Encrypt HTTPS 网站配置 – 简书
root /home/wwwroot/lzres.win; # 在这儿把下面三行代码添加到文件中, 其他不用管 if ($server_port = 80 ) { return 301 https://$host$request_uri; } |
还是去使用scheme的方案试试:
先找到自己的conf文件:
[root@crifan crifan_wwwroot]# ls /usr/local/nginx/conf/ codeigniter.conf ecshop.conf fastcgi_params mime.types.default sablog.conf typecho.conf wp2.conf dabr.conf enable-php.conf fastcgi_params.default nginx.conf scgi_params uwsgi_params dedecms.conf enable-php-pathinfo.conf koi-utf nginx.conf.default scgi_params.default uwsgi_params.default discuz.conf enable-ssl-example.conf koi-win none.conf shopex.conf vhost discuzx.conf fastcgi.conf laravel.conf pathinfo.conf ssl win-utf drupal.conf fastcgi.conf.default mime.types phpwind.conf typecho2.conf wordpress.conf [root@crifan crifan_wwwroot]# ls /usr/local/nginx/conf/vhost/www.crifan.com.conf -lha -rw-r–r– 1 root root 2.3K Sep 6 11:34 /usr/local/nginx/conf/vhost/www.crifan.com.conf |
然后去编辑:
vi /usr/local/nginx/conf/vhost/www.crifan.com.conf |
然后重启lnmp(或单独重启nginx)
[root@crifan crifan_wwwroot]# lnmp help +——————————————-+ | Manager for LNMP, Written by Licess | +——————————————-+ | https://lnmp.org | +——————————————-+ Usage: lnmp {start|stop|reload|restart|kill|status} Usage: lnmp {nginx|mysql|mariadb|php-fpm|pureftpd} {start|stop|reload|restart|kill|status} Usage: lnmp vhost {add|list|del} Usage: lnmp database {add|list|edit|del} Usage: lnmp ftp {add|list|edit|del|show} Usage: lnmp ssl add [root@crifan crifan_wwwroot]# lnmp nginx restart +——————————————-+ | Manager for LNMP, Written by Licess | +——————————————-+ | https://lnmp.org | +——————————————-+ Stoping nginx… done Starting nginx… done |
然后去浏览器中输入:
看看是否会跳转到https开头的地址
Safari
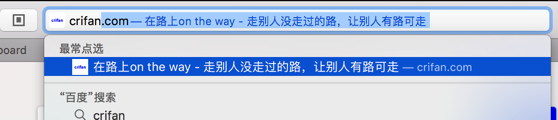
果然自动跳转到https://www.crifan.com了:

【总结】
在安装好LNMP后,之前由于DNS域名没有解析到新服务器地址,所以添加虚拟主机期间自动生成ssl失败了。
现在需要重新添加ssl的话,其实很简单:
1.通过lnmp自动添加ssl证书
lnmp ssl add |
然后按照提示去输入对应的
和
允许rewrite,输入y
默认rewriter为:wordpress
选择2(使用Let’s Encrypt)去自动生成ssl证书和密钥
再输入自己的邮箱地址,即可自动生成SSL
2.对于SSL证书,默认6个月就过期了,需要续期。
其内部自动会使用crontab去定期更新SSL证书。
所以此处再去确认更新ssl证书的脚本的确正常运行了:
crontab -l |
确认的确已经存在了certbot renew即可。
3.如果想要
输入
和
自动跳转到:
的话,则去设置301自动跳转。
办法有很多,最简单的一种是:
编辑自己的虚拟主机的nginx的配置文件:
vi /usr/local/nginx/conf/vhost/www.crifan.com.conf |
对于本身已经设置好的:
监听80端口的http
(下面还有监听304端口的https)
中的配置中,在:
root /home/wwwroot/www.crifan.com;
之后,添加:
if ($scheme = http) { return 301 https://$host$request_uri; } |
含义说明:
如果是http的访问,则自动301跳转到https的地址,host是主机地址,此处就是www.crifan.com,request_uri是对应的请求的地址,比如
当访问:
https://www.crifan.com/webpack_dev_server_open_home_page_cannot_get_slash_undefined/
则request_uri就是:webpack_dev_server_open_home_page_cannot_get_slash_undefined
变成:
server { listen 80; #listen [::]:80; server_name www.crifan.com crifan.com; index index.html index.htm index.php default.html default.htm default.php; root /home/wwwroot/www.crifan.com; if ($scheme = http) { return 301 https://$host$request_uri; } include wordpress.conf; 。。。。 } server { listen 443 ssl http2; #listen [::]:443 ssl http2; server_name www.crifan.com crifan.com; index index.html index.htm index.php default.html default.htm default.php; root /home/wwwroot/www.crifan.com; ssl on; 。。。。 } |
即可。