折腾:
【无需解决】CentOS中正在运行的Solr如何得到其所有的配置
期间,对于本地solr复制在线环境,好像行不通(至少现在不会,以后有机会再说)
现在先去本地新建qa的collection,然后再去运行脚本导入数据。
而大概步骤是:
新建qa这个collection
等价于mysql中的database
而新建的方式,有两种:
http://localhost:8983/solr/ 界面上,新建名为qa的Core
命令行中:solr create -c qa -s 2 -rf 2
导入数据
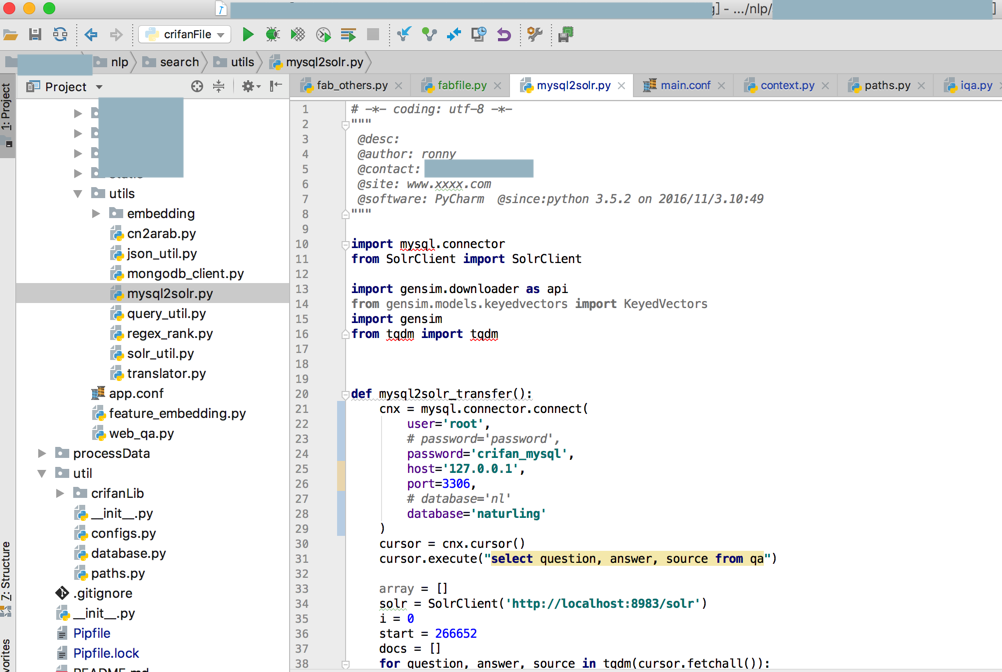
运行此处的mysql2solr.py脚本,去从mysql中的xx的qa的表中,导入数据到solr中
对此,其实是后来才知道:
本地需要先去运行Python脚本,去从已有mysql数据库中qa的表中生成需要的数据的:
本来打算,为了防止影响,而去删除本地之前拷贝到solr中的qa的整个目录的
不过听说:
solr会自动覆盖的,就暂时不删除之前solr中qa目录了
先去试试能否跑通,以及之后再去优化data数据的目录-》可以单独设置数据的目录的,而不会影响到solr的使用
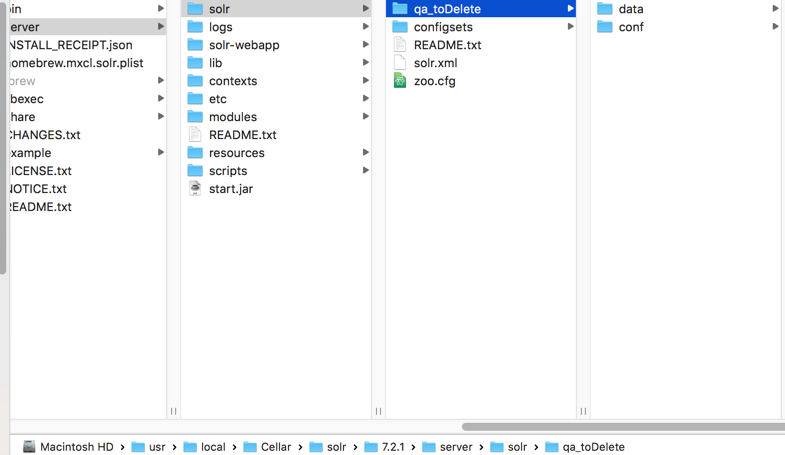
不过听说需要手动新建qa,所以为了避免影响,还是删除掉从在线的环境中复制到本地的qa的目录吧:
/usr/local/Cellar/solr/7.2.1/server/solr
中的qa:
(改名,后续再删除)
然后再去想办法新建一个qa:
用命令行试试:
<code>solr create -c qa -s 2 -rf 2
</code>
运行之前,去搜搜,看看参数是什么含义
solr create
Solr in 5 minutes – Solr Tutorial.com
How do I create a Solr core on my server? | Code Enigma
Running Solr | Apache Solr Reference Guide 6.6
<code>➜ solr git:(master) ✗ solr create -help Usage: solr create [-c name] [-d confdir] [-n configName] [-shards #] [-replicationFactor #] [-p port] [-V] Create a core or collection depending on whether Solr is running in standalone (core) or SolrCloud mode (collection). In other words, this action detects which mode Solr is running in, and then takes the appropriate action (either create_core or create_collection). For detailed usage instructions, do: bin/solr create_core -help or bin/solr create_collection -help ➜ solr git:(master) ✗ solr create_core -help Usage: solr create_core [-c core] [-d confdir] [-p port] [-V] -c <core> Name of core to create -d <confdir> Configuration directory to copy when creating the new core, built-in options are: _default: Minimal configuration, which supports enabling/disabling field-guessing support sample_techproducts_configs: Example configuration with many optional features enabled to demonstrate the full power of Solr If not specified, default is: _default Alternatively, you can pass the path to your own configuration directory instead of using one of the built-in configurations, such as: bin/solr create_core -c mycore -d /tmp/myconfig -p <port> Port of a local Solr instance where you want to create the new core If not specified, the script will search the local system for a running Solr instance and will use the port of the first server it finds. -V Enable more verbose output. ➜ solr git:(master) ✗ solr create_collection -help Usage: solr create_collection [-c collection] [-d confdir] [-n configName] [-shards #] [-replicationFactor #] [-p port] [-V] -c <collection> Name of collection to create -d <confdir> Configuration directory to copy when creating the new collection, built-in options are: _default: Minimal configuration, which supports enabling/disabling field-guessing support sample_techproducts_configs: Example configuration with many optional features enabled to demonstrate the full power of Solr If not specified, default is: _default Alternatively, you can pass the path to your own configuration directory instead of using one of the built-in configurations, such as: bin/solr create_collection -c mycoll -d /tmp/myconfig By default the script will upload the specified confdir directory into Zookeeper using the same name as the collection (-c) option. Alternatively, if you want to reuse an existing directory or create a confdir in Zookeeper that can be shared by multiple collections, use the -n option -n <configName> Name the configuration directory in Zookeeper; by default, the configuration will be uploaded to Zookeeper using the collection name (-c), but if you want to use an existing directory or override the name of the configuration in Zookeeper, then use the -c option. -shards <#> Number of shards to split the collection into; default is 1 -replicationFactor <#> Number of copies of each document in the collection, default is 1 (no replication) -p <port> Port of a local Solr instance where you want to create the new collection If not specified, the script will search the local system for a running Solr instance and will use the port of the first server it finds. -V Enable more verbose output. ➜ solr git:(master) ✗ </code>
对于命令:
<code>solr create -c qa -s 2 -rf 2
</code>
->
-c qa
-c <core> Name of core to create
qa是core的名字
-s 2
没找到,感觉像是:
-shards <#> Number of shards to split the collection into; default is 1
表示有2个shards
-rf 2
没找到,感觉像是:
-replicationFactor <#> Number of copies of each document in the collection, default is 1 (no replication)
意思是是replicationFactor是2
后来看到:
Solr Tutorial | Apache Solr Reference Guide 7.4
是7.4的版本的教程,中间有提到:
<code>And then create a new collection: bin/solr create -c <yourCollection> -s 2 -rf 2 </code>
再去确认Mac本地的solr的版本:
此处是7.2.1的solr,难道是不支持-s和-rf的参数名缩写?
至少官网没有提到啊,而只有新版7.4的官网文档才提示了。
算了,先去创建试试:
<code>➜  solr git:(master) ✗ solr create -c qa -s 2 -rf 2
WARNING: Using _default configset. Data driven schema functionality is enabled by default, which is
         NOT RECOMMENDED for production use.

         To turn it off:
            curl http://localhost:8983/solr/qa/config -d '{"set-user-property": {"update.autoCreateFields":"false"}}'
</code>
感觉卡死了?
等了好几十秒才完成:
<code>➜  solr git:(master) ✗ solr create -c qa -s 2 -rf 2
WARNING: Using _default configset. Data driven schema functionality is enabled by default, which is
         NOT RECOMMENDED for production use.

         To turn it off:
            curl http://localhost:8983/solr/qa/config -d '{"set-user-property": {"update.autoCreateFields":"false"}}'

Created new core 'qa'
</code>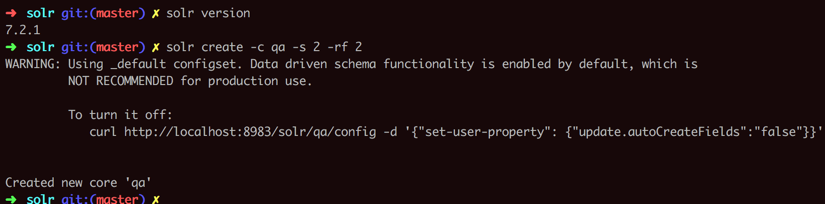
生成的文件和目录结构是:
<code>➜  solr git:(master) ✗ pwd
/usr/local/Cellar/solr/7.2.1/server/solr
➜  solr git:(master) ✗ ll
total 24
-rw-r--r--  1 crifan  admin   2.9K  1 10  2018 README.txt
drwxr-xr-x  4 crifan  admin   128B  1 10  2018 configsets
drwxr-xr-x  5 crifan  admin   160B  8 21 11:55 qa
drwx------@ 5 crifan  admin   160B  8 16 17:15 qa_toDelete
-rw-r--r--  1 crifan  admin   2.1K  1 10  2018 solr.xml
-rw-r--r--  1 crifan  admin   975B  1 10  2018 zoo.cfg
➜  solr git:(master) ✗ tree qa
qa
├── conf
│   ├── lang
│   │   ├── contractions_ca.txt
│   │   ├── contractions_fr.txt
│   │   ├── contractions_ga.txt
│   │   ├── contractions_it.txt
│   │   ├── hyphenations_ga.txt
│   │   ├── stemdict_nl.txt
│   │   ├── stoptags_ja.txt
...
│   │   ├── stopwords_tr.txt
│   │   └── userdict_ja.txt
│   ├── managed-schema
│   ├── params.json
│   ├── protwords.txt
│   ├── solrconfig.xml
│   ├── stopwords.txt
│   └── synonyms.txt
├── core.properties
└── data
    ├── index
    │   ├── segments_1
    │   └── write.lock
    ├── snapshot_metadata
    └── tlog

6 directories, 47 files
➜  solr git:(master) ✗
</code>
其中,如果想要设置data的目录,参考:
https://lucene.apache.org/solr/guide/6_6/coreadmin-api.html#CoreAdminAPI-Input.1
和之前help的输出,感觉是:
传入-d参数?
<code> -d <confdir> Configuration directory to copy when creating the new collection, built-in options are: _default: Minimal configuration, which supports enabling/disabling field-guessing support sample_techproducts_configs: Example configuration with many optional features enabled to demonstrate the full power of Solr If not specified, default is: _default Alternatively, you can pass the path to your own configuration directory instead of using one of the built-in configurations, such as: bin/solr create_collection -c mycoll -d /tmp/myconfig By default the script will upload the specified confdir directory into Zookeeper using the same name as the collection (-c) option. Alternatively, if you want to reuse an existing directory or create a confdir in Zookeeper that can be shared by multiple collections, use the -n option </code>
然后去运行solr的服务端:
<code>➜  solr git:(master) ✗ solr stop -all
Sending stop command to Solr running on port 8983 ... waiting up to 180 seconds to allow Jetty process 41795 to stop gracefully.
➜  solr git:(master) ✗ solr start
Waiting up to 180 seconds to see Solr running on port 8983 [-]
Started Solr server on port 8983 (pid=43113). Happy searching!

➜  solr git:(master) ✗ solr status

Found 1 Solr nodes:

Solr process 43113 running on port 8983
{
  "solr_home":"/usr/local/Cellar/solr/7.2.1/server/solr",
  "version":"7.2.1 b2b6438b37073bee1fca40374e85bf91aa457c0b - ubuntu - 2018-01-10 00:54:21",
  "startTime":"2018-08-21T04:02:56.365Z",
  "uptime":"0 days, 0 hours, 0 minutes, 39 seconds",
  "memory":"27.2 MB (%5.5) of 490.7 MB"}
</code>
然后再去调试本地代码,导入数据
期间出错:
【已解决】python调用torndb出错:import MySQLdb.constants ModuleNotFoundError: No module named MySQLdb
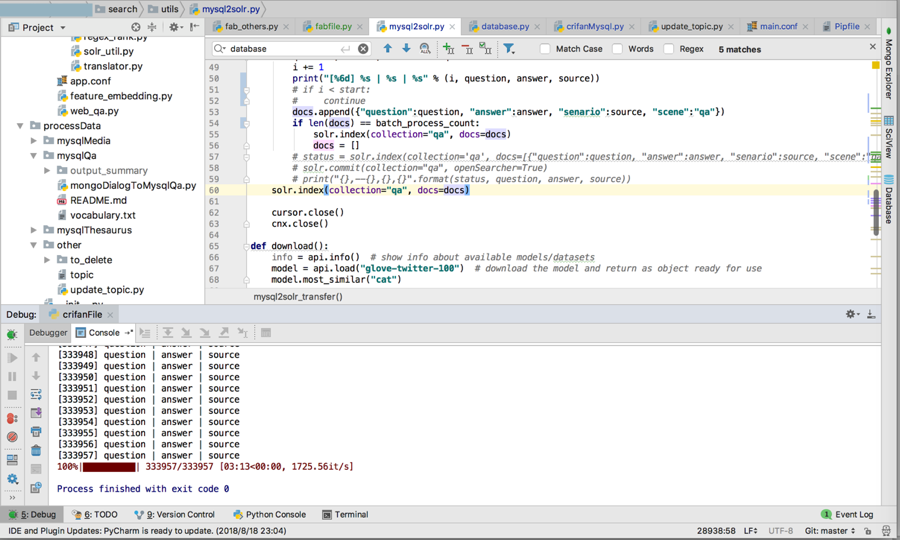
然后去运行调试输出效果的代码,结果半天没反应
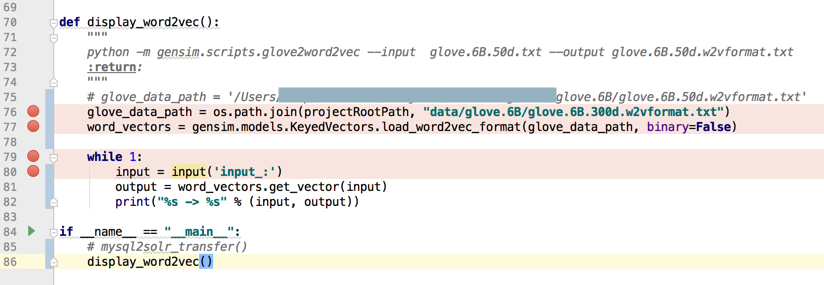
-》貌似初始化需要很长时间?
不清楚
算了,不管这里的display_word2vec,去试试之前的,调试兜底对话的代码吧
另外:
<code>➜  solr git:(master) ✗ solr status

Found 1 Solr nodes:

Solr process 43113 running on port 8983
{
  "solr_home":"/usr/local/Cellar/solr/7.2.1/server/solr",
  "version":"7.2.1 b2b6438b37073bee1fca40374e85bf91aa457c0b - ubuntu - 2018-01-10 00:54:21",
  "startTime":"2018-08-21T04:02:56.365Z",
  "uptime":"0 days, 1 hours, 42 minutes, 0 seconds",
  "memory":"265 MB (%54) of 490.7 MB"}
</code>
看到solr的memory用了很多 -》 之前只用了20多M,现在200多MB
-》估计是保存数据的确进去了?
去看看本地文件夹,果然是data目录下多了很多数据:
<code>➜  solr git:(master) ✗ ll
total 24
-rw-r--r--  1 crifan  admin   2.9K  1 10  2018 README.txt
drwxr-xr-x  4 crifan  admin   128B  1 10  2018 configsets
drwxr-xr-x  5 crifan  admin   160B  8 21 11:55 qa
drwx------@ 5 crifan  admin   160B  8 16 17:15 qa_toDelete
-rw-r--r--  1 crifan  admin   2.1K  1 10  2018 solr.xml
-rw-r--r--  1 crifan  admin   975B  1 10  2018 zoo.cfg
➜  solr git:(master) ✗ tree qa
qa
├── conf
│   ├── lang
│   │   ├── contractions_ca.txt
...
│   │   └── userdict_ja.txt
│   ├── managed-schema
│   ├── params.json
│   ├── protwords.txt
│   ├── solrconfig.xml
│   ├── stopwords.txt
│   └── synonyms.txt
├── core.properties
└── data
    ├── index
    │   ├── _4.fdt
    │   ├── _4.fdx
    │   ├── _4.fnm
    │   ├── _4.nvd
    │   ├── _4.nvm
    │   ├── _4.si
    │   ├── _4_Lucene50_0.doc
    │   ├── _4_Lucene50_0.pos
    │   ├── _4_Lucene50_0.tim
    │   ├── _4_Lucene50_0.tip
    │   ├── _4_Lucene70_0.dvd
    │   ├── _4_Lucene70_0.dvm
    │   ├── _b.fdt
    │   ├── _b.fdx
    │   ├── _b.fnm
    │   ├── _b.nvd
    │   ├── _b.nvm
    │   ├── _b.si
    │   ├── _b_Lucene50_0.doc
    │   ├── _b_Lucene50_0.pos
    │   ├── _b_Lucene50_0.tim
    │   ├── _b_Lucene50_0.tip
    │   ├── _b_Lucene70_0.dvd
    │   ├── _b_Lucene70_0.dvm
    │   ├── _c.fdt
    │   ├── _c.fdx
    │   ├── _c.fnm
    │   ├── _c.nvd
    │   ├── _c.nvm
    │   ├── _c.si
    │   ├── _c_Lucene50_0.doc
    │   ├── _c_Lucene50_0.pos
    │   ├── _c_Lucene50_0.tim
    │   ├── _c_Lucene50_0.tip
    │   ├── _c_Lucene70_0.dvd
    │   ├── _c_Lucene70_0.dvm
    │   ├── _d.fdt
    │   ├── _d.fdx
    │   ├── _d.fnm
    │   ├── _d.nvd
    │   ├── _d.nvm
    │   ├── _d.si
    │   ├── _d_Lucene50_0.doc
    │   ├── _d_Lucene50_0.pos
    │   ├── _d_Lucene50_0.tim
    │   ├── _d_Lucene50_0.tip
    │   ├── _d_Lucene70_0.dvd
    │   ├── _d_Lucene70_0.dvm
    │   ├── _e.fdt
    │   ├── _e.fdx
    │   ├── _e.fnm
    │   ├── _e.nvd
    │   ├── _e.nvm
    │   ├── _e.si
    │   ├── _e_Lucene50_0.doc
    │   ├── _e_Lucene50_0.pos
    │   ├── _e_Lucene50_0.tim
    │   ├── _e_Lucene50_0.tip
    │   ├── _e_Lucene70_0.dvd
    │   ├── _e_Lucene70_0.dvm
    │   ├── _f.fdt
    │   ├── _f.fdx
    │   ├── _f.fnm
    │   ├── _f.nvd
    │   ├── _f.nvm
    │   ├── _f.si
    │   ├── _f_Lucene50_0.doc
    │   ├── _f_Lucene50_0.pos
    │   ├── _f_Lucene50_0.tim
    │   ├── _f_Lucene50_0.tip
    │   ├── _f_Lucene70_0.dvd
    │   ├── _f_Lucene70_0.dvm
    │   ├── segments_9
    │   └── write.lock
    ├── snapshot_metadata
    └── tlog
        └── tlog.0000000000000000007

6 directories, 120 files
➜  solr git:(master) ✗ du -sh qa/*
296K    qa/conf
4.0K    qa/core.properties
41M    qa/data
</code>