折腾:
期间,去开启authorization:
vi /etc/mongod.conf
32 security:
33 authorization: ‘enabled’
34
(然后重启MongoDB)后,客户端,就无法连接了,连接就报错了:
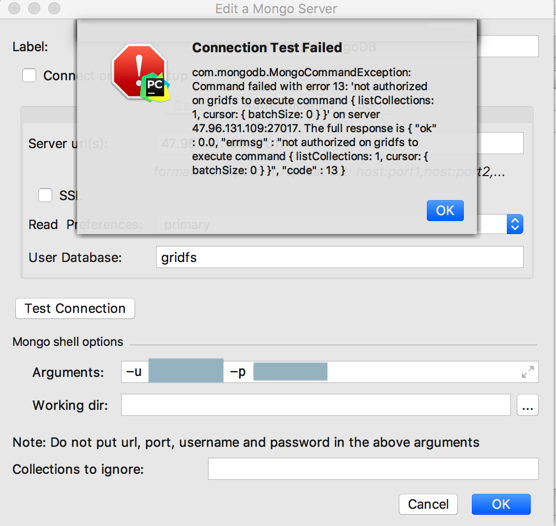
结果:
也是错误:
com.mongodb.MongoCommandExceptions: Command failed with error 13 not authorized on gridfs to execute command
继续看官网文档:
Role-Based Access Control — MongoDB Manual 3.6
之前没完全看懂。
加了
–auth
也还是失败:
试了一堆,还是不行:
[root@naturling-general-01 ~]# mongo
MongoDB shell version: 3.2.19
connecting to: test
> use gridfs
switched to db gridfs
> show collections
2018-04-02T17:38:45.875+0800 E QUERY [thread1] Error: listCollections failed: {
"ok" : 0,
"errmsg" : "not authorized on gridfs to execute command { listCollections: 1.0, filter: {} }",
"code" : 13
} :
_getErrorWithCode@src/mongo/shell/utils.js:25:13
DB.prototype._getCollectionInfosCommand@src/mongo/shell/db.js:773:1
DB.prototype.getCollectionInfos@src/mongo/shell/db.js:785:19
DB.prototype.getCollectionNames@src/mongo/shell/db.js:796:16
shellHelper.show@src/mongo/shell/utils.js:774:9
shellHelper@src/mongo/shell/utils.js:671:15
@(shellhelp2):1:1
> show users
2018-04-02T17:38:51.092+0800 E QUERY [thread1] Error: not authorized on gridfs to execute command { usersInfo: 1.0 } :
_getErrorWithCode@src/mongo/shell/utils.js:25:13
DB.prototype.getUsers@src/mongo/shell/db.js:1523:1
shellHelper.show@src/mongo/shell/utils.js:764:9
shellHelper@src/mongo/shell/utils.js:671:15
@(shellhelp2):1:1
> db.auth("naturling", "xxx")
1
> show users
2018-04-02T17:39:11.083+0800 E QUERY [thread1] Error: not authorized on gridfs to execute command { usersInfo: 1.0 } :
_getErrorWithCode@src/mongo/shell/utils.js:25:13
DB.prototype.getUsers@src/mongo/shell/db.js:1523:1
shellHelper.show@src/mongo/shell/utils.js:764:9
shellHelper@src/mongo/shell/utils.js:671:15
@(shellhelp2):1:1
>
[MONGOID-4067] authentication failed failed with error 13: "not authorized for insert on – MongoDB
[HADOOP-305] Command failed with error 13: ‘not authorized – MongoDB
not able to run migration script, error: not authorized · Issue #56 · mongeez/mongeez
好像是需要:
db.createRole
Role-Based Access Control — MongoDB Manual 3.6
感觉是:需要user,也还需要role
Authentication — MongoDB Manual 3.6
好像是缺少了:
—authenticationDatabase
参数了?
去试试
-u naturling -p xxx –authenticationDatabase gridfs
错误依旧:
mongodb Command failed with error 13 not authorized on gridfs to execute command
mongodb – show dbs gives "Not Authorized to execute command" error – Stack Overflow
说是需要:
db.grantRolesToUser
的
所以,取消配置
vi /etc/mongod.conf
中的:
33 authorization: ‘enabled’
以便有权限操作,然后去操作上述命令:
> show dbs
admin 0.000GB
gridfs 0.400GB
local 0.000GB
> db.grantRolesToUser(
… "naturling",
… [
… { role: "readWrite", db: "admin" }
… ]
… )
> db.auth("naturling", "xxx")
1
>
> use gridfs
switched to db gridfs
> db.auth("naturling", "xxx")
1
> db.grantRolesToUser(
… "naturling",
… [
… { role: "readWrite", db: "gridfs" }
… ]
… )
>
>
>
> use admin
switched to db admin
> db.auth("naturling", "xxx")
1
> db.grantRolesToUser(
… "naturling",
… [
… { role: "readWrite", db: "admin" }
… ]
… )
给admin和gridfs都授权给了用户:naturling了。
然后注意到:
并没有去修改配置:
vi /etc/mongod.conf
中的:
32 #security:
33 # authorization: ‘enabled’
之前已经配置好了用户,那么再去试试:
Mac本地的Mongo shell去连接远程Mongo试试
➜ ~ mongo –host 47.96.131.109 –port 27017 -u "naturling" -p "xxx" –authenticationDatabase "gridfs"
MongoDB shell version v3.6.3
connecting to: mongodb://47.96.131.109:27017/
MongoDB server version: 3.2.19
WARNING: shell and server versions do not match
…
结果是:
> show dbs
admin 0.000GB
gridfs 4.539GB
local 0.000GB
> use local
switched to db local
> show collections
startup_log
test
> db.testOps.insertOne({"testKey": "testValue"})
{
"acknowledged" : true,
"insertedId" : ObjectId("5ac492a0b04d5e0814f6b4b7")
}
> show collections
startup_log
test
testOps
> db.testOps.find().pretty()
{ "_id" : ObjectId("5ac492a0b04d5e0814f6b4b7"), "testKey" : "testValue" }
此处用这个用户去连接远端Mongo后,是可以直接操作,除了之前指定了的权限的数据库(gridfs和admin)的,换句话说:
貌似之前用户和权限的限制是不起效果的?
> use admin
switched to db admin
> show users
{
"_id" : "admin.naturling",
"user" : "naturling",
"db" : "admin",
"roles" : [
{
"role" : "readWrite",
"db" : "admin"
},
{
"role" : "readWrite",
"db" : "gridfs"
}
]
}
> use gridfs
switched to db gridfs
> show users
{
"_id" : "gridfs.naturling",
"user" : "naturling",
"db" : "gridfs",
"roles" : [
{
"role" : "readWrite",
"db" : "gridfs"
}
]
}
> use local
switched to db local
> show users
>
然后再去试试,本地mongo shell连接时,不指定用户名和密码,看看能否连接上
然后不仅连接上了:
➜ ~ mongo –host 47.96.131.109 –port 27017
MongoDB shell version v3.6.3
connecting to: mongodb://47.96.131.109:27017/
MongoDB server version: 3.2.19
WARNING: shell and server versions do not match
…
还能有删除操作:
> show dbs
admin 0.000GB
gridfs 4.539GB
local 0.000GB
> use local
switched to db local
> show collections
startup_log
test
testOps
> db.testOps.deleteOne()
2018-04-04T16:59:06.508+0800 E QUERY [thread1] Error: find() requires query criteria :
Bulk/this.find@src/mongo/shell/bulk_api.js:786:1
DBCollection.prototype.deleteOne@src/mongo/shell/crud_api.js:351:20
@(shell):1:1
> db.testOps.find()
{ "_id" : ObjectId("5ac492a0b04d5e0814f6b4b7"), "testKey" : "testValue" }
> db.testOps.deleteOne("_id": ‘ObjectId("5ac492a0b04d5e0814f6b4b7")’)
2018-04-04T17:00:04.039+0800 E QUERY [thread1] SyntaxError: missing ) after argument list @(shell):1:26
> db.testOps.deleteOne({"_id": ‘ObjectId("5ac492a0b04d5e0814f6b4b7")’})
{ "acknowledged" : true, "deletedCount" : 0 }
> db.testOps.deleteOne({"_id": ‘5ac492a0b04d5e0814f6b4b7’})
{ "acknowledged" : true, "deletedCount" : 0 }
> db.testOps.deleteOne({"_id": ObjectId("5ac492a0b04d5e0814f6b4b7")})
{ "acknowledged" : true, "deletedCount" : 1 }
说明此处的用户名和密码,就没生效。
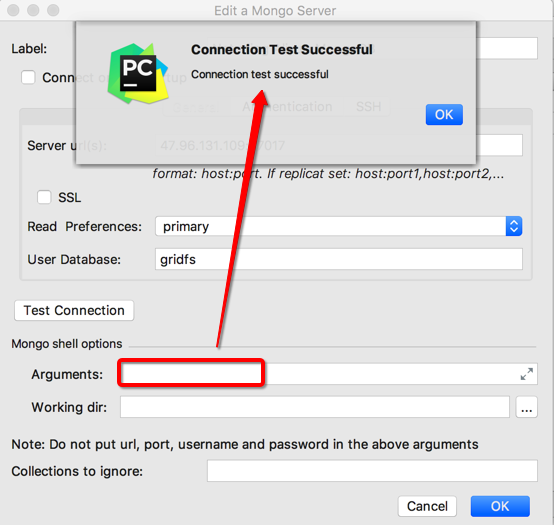
然后回到PyCharm中Mongo插件去试试,也是一样结果:
去掉参数:
-u naturling -p xxx
后,依旧可以成功连接:
给你的mongodb设置密码吧! – 个人文章 – SegmentFault 思否
给mongod 加上–auth参数,或许就是:
配置文件中的:authorization?
原来db.auth是用来验证,用户是否添加成功的:
1表示成功
0表示失败
db.auth() — MongoDB Manual 3.6
“db.auth() returns 0 when authentication is not successful, and 1 when the operation is successful.”
Security Checklist — MongoDB Manual 3.6
-》
Authentication — MongoDB Manual 3.6
Enable Auth — MongoDB Manual 3.6
Role-Based Access Control — MongoDB Manual 3.6
另外,关于分片内部的认证是参考:
Internal Authentication — MongoDB Manual 3.6
去把一些经验和心得,整理到:
了解了一些之后,去删除之前的用户,重新创建再说
dropAllUsersFromDatabase — MongoDB Manual 3.6
> show dbs
admin 0.000GB
gridfs 4.539GB
local 0.000GB
> use admin
switched to db admin
> show users
{
"_id" : "admin.naturling",
"user" : "naturling",
"db" : "admin",
"roles" : [
{
"role" : "readWrite",
"db" : "admin"
},
{
"role" : "readWrite",
"db" : "gridfs"
}
]
}
> db.runCommand({dropAllUsersFromDatabase: 1})
{ "n" : 1, "ok" : 1 }
> show users
> use gridfs
switched to db gridfs
> show users
{
"_id" : "gridfs.naturling",
"user" : "naturling",
"db" : "gridfs",
"roles" : [
{
"role" : "readWrite",
"db" : "gridfs"
}
]
}
> db.runCommand({dropAllUsersFromDatabase: 1})
{ "n" : 1, "ok" : 1 }
> show users
>
继续参考:
Enable Auth — MongoDB Manual 3.6
好像是需要:
此处在没有开启访问控制之前,先去建立admin数据库中,创建一个拥有userAdmin或userAdminAnyDatabase权限的用户
然后再去开启访问控制
之后通过该用户,再去创建其他用户?
此处,没开启权限控制之前,先去:
> use admin
switched to db admin
> show users
> db.createUser(
… {
… user: "admin",
… pwd: "xxx",
… roles: [ { role: "userAdminAnyDatabase", db: "admin" } ]
… }
… )
Successfully added user: {
"user" : "admin",
"roles" : [
{
"role" : "userAdminAnyDatabase",
"db" : "admin"
}
]
}
> show users
{
"_id" : "admin.admin",
"user" : "admin",
"db" : "admin",
"roles" : [
{
"role" : "userAdminAnyDatabase",
"db" : "admin"
}
]
}
但是故意在没开启权限之前,继续给另外的一个数据库gridfs创建一个用户:
> use gridfs
switched to db gridfs
> db.createUser(
… {
… user: "gridfs",
… pwd: "xxx",
… roles: [ { role: "dbOwner", db: "gridfs" } ]
… }
… )
Successfully added user: {
"user" : "gridfs",
"roles" : [
{
"role" : "dbOwner",
"db" : "gridfs"
}
]
}
> show users
{
"_id" : "gridfs.gridfs",
"user" : "gridfs",
"db" : "gridfs",
"roles" : [
{
"role" : "dbOwner",
"db" : "gridfs"
}
]
}
看看开启权限控制之后,这个在开启之前就创建的用户是否有效
然后去开启访问控制:
vi /etc/mongod.conf
32 security:
33 authorization: ‘enabled’
然后重启服务器端的mongo数据库
[root@naturling-general-01 ~]# systemctl restart mongod
[root@naturling-general-01 ~]# systemctl status mongod
[0m mongod.service – SYSV: Mongo is a scalable, document-oriented database.
Loaded: loaded (/etc/rc.d/init.d/mongod; bad; vendor preset: disabled)
Active: active (running) since Sun 2018-04-08 11:41:20 CST; 6s ago
Docs: man:systemd-sysv-generator(8)
Process: 21324 ExecStop=/etc/rc.d/init.d/mongod stop (code=exited, status=0/SUCCESS)
Process: 21342 ExecStart=/etc/rc.d/init.d/mongod start (code=exited, status=0/SUCCESS)
CGroup: /system.slice/mongod.service
21357 /usr/bin/mongod -f /etc/mongod.conf
Apr 08 11:41:20 naturling-general-01 systemd[1]: Starting SYSV: Mongo is a scalable, document-oriented database….
Apr 08 11:41:20 naturling-general-01 runuser[21353]: pam_unix(runuser:session): session opened for user mongod by (uid=0)
Apr 08 11:41:20 naturling-general-01 runuser[21353]: pam_unix(runuser:session): session closed for user mongod
Apr 08 11:41:20 naturling-general-01 mongod[21342]: Starting mongod: [ OK ]
Apr 08 11:41:20 naturling-general-01 systemd[1]: Started SYSV: Mongo is a scalable, document-oriented database..
通过log:
[root@naturling-general-01 ~]# tail -n 30 /var/log/mongodb/mongod.log
2018-04-08T11:41:20.160+0800 I CONTROL [signalProcessingThread] dbexit: rc: 0
2018-04-08T11:41:20.358+0800 I CONTROL [main] ***** SERVER RESTARTED *****
2018-04-08T11:41:20.366+0800 I CONTROL [initandlisten] MongoDB starting : pid=21357 port=27017 dbpath=/var/lib/mongo 64-bit host=naturling-general-01
2018-04-08T11:41:20.366+0800 I CONTROL [initandlisten] db version v3.2.19
2018-04-08T11:41:20.366+0800 I CONTROL [initandlisten] git version: a9f574de6a566a58b24d126b44a56718d181e989
2018-04-08T11:41:20.366+0800 I CONTROL [initandlisten] OpenSSL version: OpenSSL 1.0.1e-fips 11 Feb 2013
2018-04-08T11:41:20.366+0800 I CONTROL [initandlisten] allocator: tcmalloc
2018-04-08T11:41:20.366+0800 I CONTROL [initandlisten] modules: none
2018-04-08T11:41:20.366+0800 I CONTROL [initandlisten] build environment:
2018-04-08T11:41:20.366+0800 I CONTROL [initandlisten] distmod: rhel70
2018-04-08T11:41:20.366+0800 I CONTROL [initandlisten] distarch: x86_64
2018-04-08T11:41:20.366+0800 I CONTROL [initandlisten] target_arch: x86_64
2018-04-08T11:41:20.366+0800 I CONTROL [initandlisten] options: { config: "/etc/mongod.conf", net: { bindIp: "0.0.0.0", port: 27017 }, processManagement: { fork: true, pidFilePath: "/var/run/mongodb/mongod.pid" }, security: { authorization: "enabled" }, storage: { dbPath: "/var/lib/mongo", journal: { enabled: true } }, systemLog: { destination: "file", logAppend: true, path: "/var/log/mongodb/mongod.log" } }
2018-04-08T11:41:20.387+0800 I – [initandlisten] Detected data files in /var/lib/mongo created by the ‘wiredTiger’ storage engine, so setting the active storage engine to ‘wiredTiger’.
2018-04-08T11:41:20.387+0800 I STORAGE [initandlisten] wiredtiger_open config: create,cache_size=8G,session_max=20000,eviction=(threads_min=4,threads_max=4),config_base=false,statistics=(fast),log=(enabled=true,archive=true,path=journal,compressor=snappy),file_manager=(close_idle_time=100000),checkpoint=(wait=60,log_size=2GB),statistics_log=(wait=0),verbose=(recovery_progress),
2018-04-08T11:41:20.573+0800 I STORAGE [initandlisten] WiredTiger [1523158880:573554][21357:0x7f1b323f2dc0], txn-recover: Main recovery loop: starting at 104/53644416
2018-04-08T11:41:20.663+0800 I STORAGE [initandlisten] WiredTiger [1523158880:663203][21357:0x7f1b323f2dc0], txn-recover: Recovering log 104 through 105
2018-04-08T11:41:20.704+0800 I STORAGE [initandlisten] WiredTiger [1523158880:704739][21357:0x7f1b323f2dc0], txn-recover: Recovering log 105 through 105
2018-04-08T11:41:20.834+0800 I CONTROL [initandlisten]
2018-04-08T11:41:20.834+0800 I CONTROL [initandlisten] ** WARNING: /sys/kernel/mm/transparent_hugepage/enabled is ‘always’.
2018-04-08T11:41:20.834+0800 I CONTROL [initandlisten] ** We suggest setting it to ‘never’
2018-04-08T11:41:20.834+0800 I CONTROL [initandlisten]
2018-04-08T11:41:20.834+0800 I CONTROL [initandlisten] ** WARNING: /sys/kernel/mm/transparent_hugepage/defrag is ‘always’.
2018-04-08T11:41:20.834+0800 I CONTROL [initandlisten] ** We suggest setting it to ‘never’
2018-04-08T11:41:20.834+0800 I CONTROL [initandlisten]
2018-04-08T11:41:20.834+0800 I CONTROL [initandlisten] ** WARNING: soft rlimits too low. rlimits set to 4096 processes, 65535 files. Number of processes should be at least 32767.5 : 0.5 times number of files.
2018-04-08T11:41:20.834+0800 I CONTROL [initandlisten]
2018-04-08T11:41:20.838+0800 I NETWORK [HostnameCanonicalizationWorker] Starting hostname canonicalization worker
2018-04-08T11:41:20.839+0800 I FTDC [initandlisten] Initializing full-time diagnostic data capture with directory ‘/var/lib/mongo/diagnostic.data’
2018-04-08T11:41:20.839+0800 I NETWORK [initandlisten] waiting for connections on port 27017
[root@naturling-general-01 ~]#
中的
security: { authorization: "enabled" }
可以看出,也是开启了权限控制了。
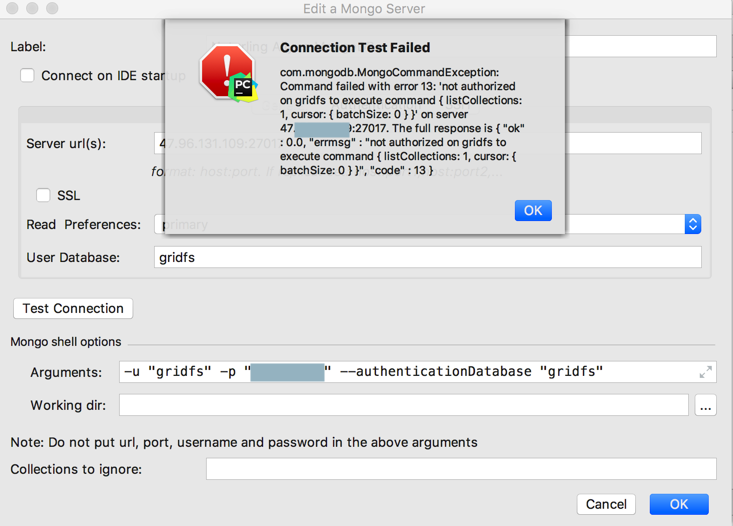
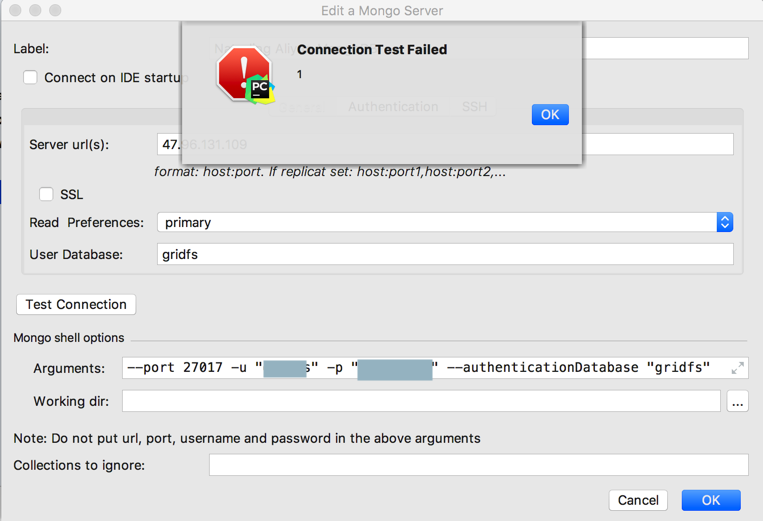
但是PyCharm中连接:
47.96.131.109:27017
gridfs
-u "gridfs" -p "xxx" –authenticationDatabase "gridfs"
却一直失败
authorization – MongoDB 3.2 authentication failed – Stack Overflow
把端口放在参数中:
结果失败原因是:1
不过,在mongo shell命令行中执行用哪个数据库,则可以直接进入该数据库:
➜ ~ mongo 47.96.131.109:27017/gridfs -u gridfs -p xxx –authenticationDatabase gridfs
MongoDB shell version v3.6.3
connecting to: mongodb://47.96.131.109:27017/gridfs
MongoDB server version: 3.2.19
WARNING: shell and server versions do not match
> show users
{
"_id" : "gridfs.gridfs",
"user" : "gridfs",
"db" : "gridfs",
"roles" : [
{
"role" : "dbOwner",
"db" : "gridfs"
}
]
}
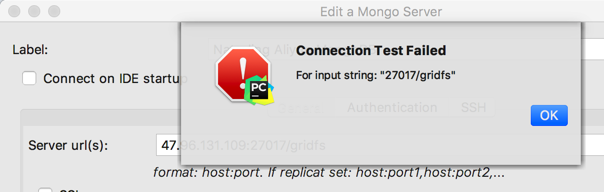
PyCharm中如何使用:
47.96.131.109:27017/gridfs
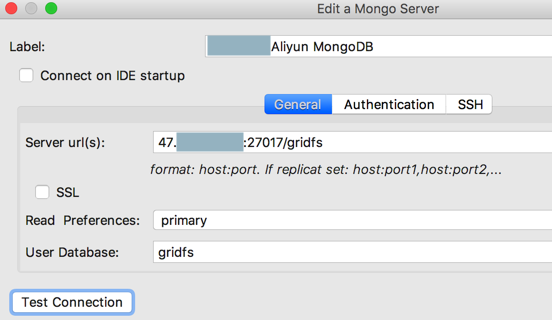
就会报错:
那再去Mac本地去连接远程服务器端mongo试试:
【已解决】本地mongo shell中连接远程加了权限控制的mongoDB
再去试试代码中是否可以正常用用户名和密码以及数据库去连接:
【已解决】pymongo中用MongoClient去连接远程加了权限控制的mongoDB
现在不论是:
本地mongo shell中,还是本地python代码的MongoClient中,都是可以正常用之前添加的
gridfs数据库的dbOwner,去登录并操作数据库的。
但是对于PyCharm中,始终还是不行:
PyCharm mongo Error: Authentication failed
intellij idea – MongoDB connection auth works on shell but not with external Tools – Stack Overflow
MongoDB-CR Authentication failed – Stack Overflow
Mongo Plugin :: JetBrains Plugin Repository
Connection to <Database> failed – IDEs Support (IntelliJ Platform) | JetBrains
PyCharm mongo servers test connection
MongoDB plugin for IntelliJ – Timed out while waiting to connect after xxxx ms – Stack Overflow
dboissier/mongo4idea: Mongo integration in Intellij
去看看官网文档
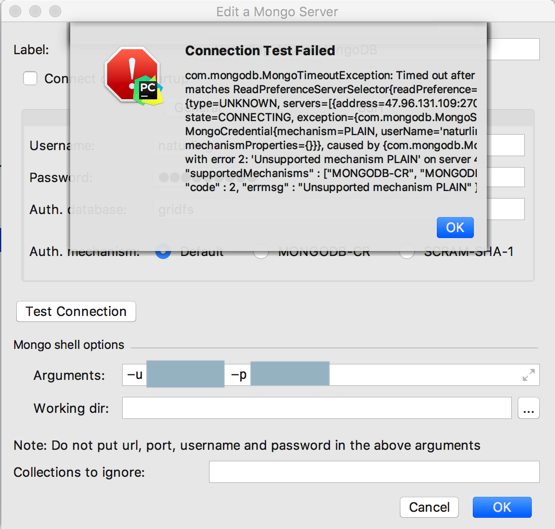
好像是认证方式选择错误?
不是Default,而是参考:
Authentication — MongoDB Manual 3.6
去试试:
SCRAM(默认)
MongoDB Challenge and Response (MONGODB-CR) (Deprecated as of MongoDB 3.6)
x.509 Certificate Authentication
经过测试发现,果然是加密方式的问题:
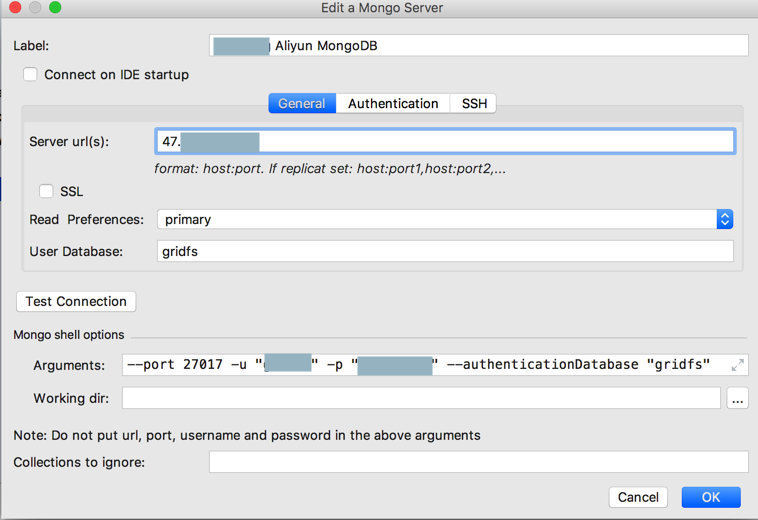
【总结】
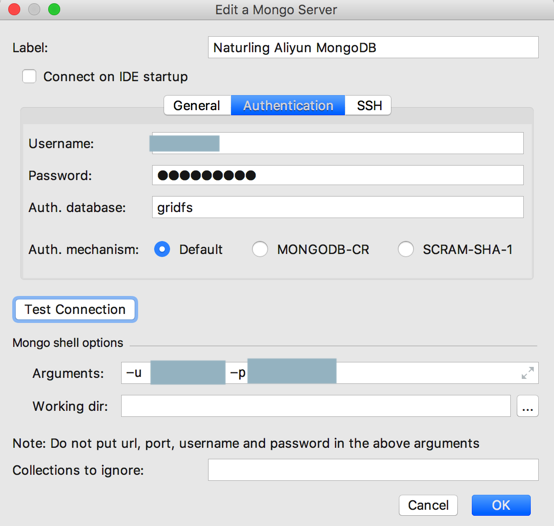
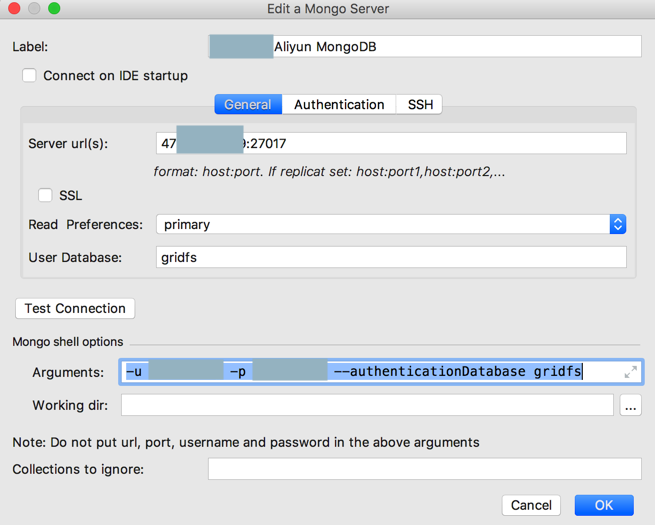
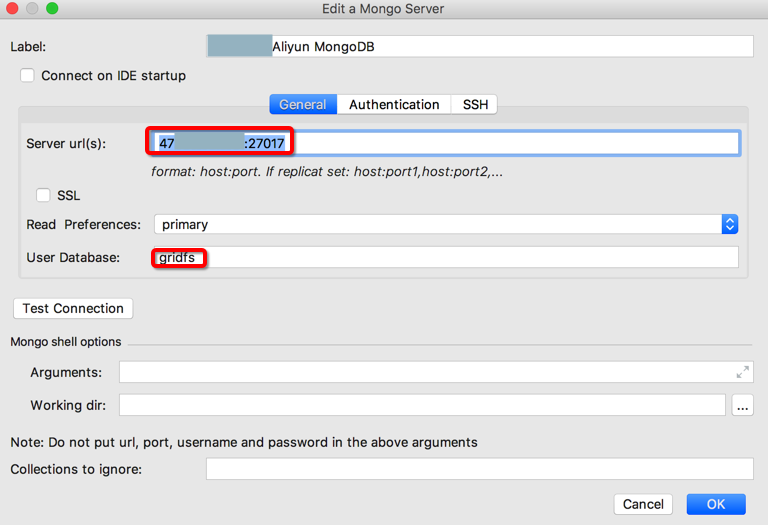
PyCharm的Mongo插件中Mongo Servers中的配置如下:
1.首先要在General中中配置对应的:
Server url(s):表示你要连接哪个数据库(和对应端口)
此处是:47.96.131.109:27017
User Database:默认要使用哪个数据库
此处是:gridfs
另外:
Read Preferences:默认是primary
不太懂
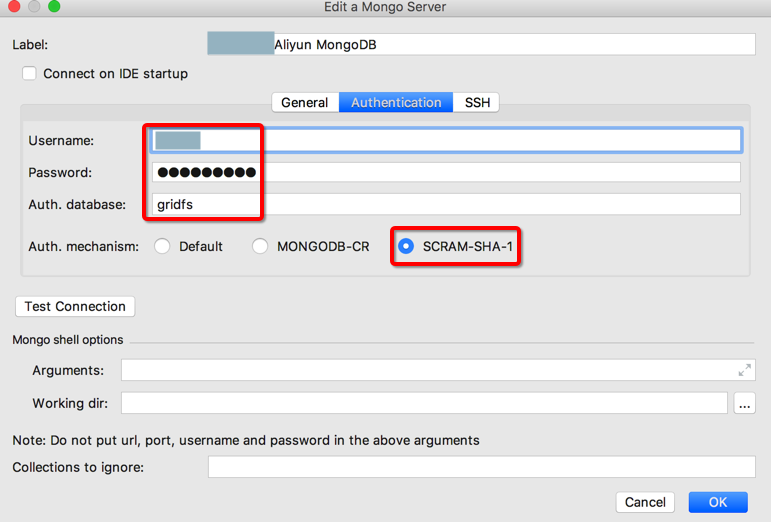
2.如果需要权限验证,才需要去配置:Authetication
Username:用户名
类似于mongo shell中的参数:-u
Password:密码
类似于mongo shell中的参数:-p
Auth. database:要验证的数据库
类似于mongo shell中的参数:–authenticationDatabase
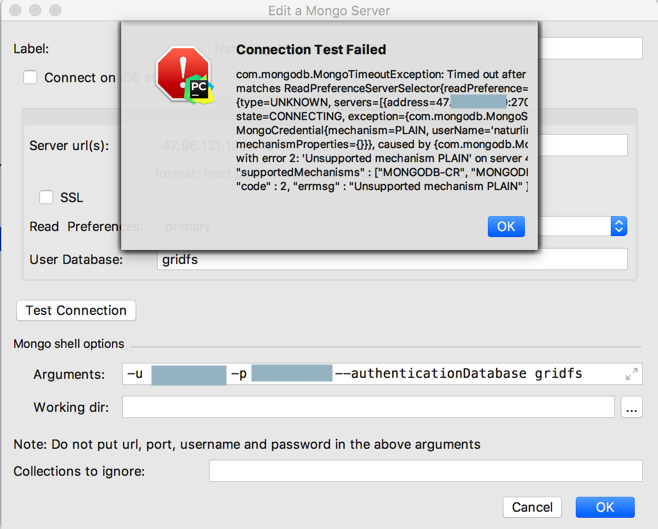
【重点来了】Auth. mechanism:
此处选择:SCRAM-SHA-1
额外说明:
之前一直使用的是 Default,是错误的,导致无法正常连接
后来是参考了官网的说明:Authentication — MongoDB Manual 3.6
得知默认的加密方式是:SCRAM
全称是:SCRAM-SHA-1
而不是SCRAM-MD5
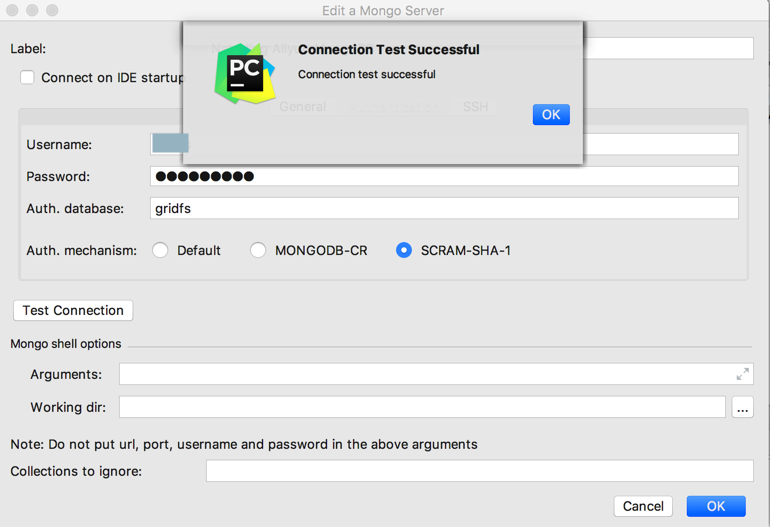
吐槽:此处插件默认的加密方式不对,导致调试了N长时间,PyCharm中一直无法登录。。,换对了加密方式SCRAM-SHA-1,才得以登录
-》
如此,General 和 Authentication都设置好后,再去测试连接,即可正常登录:
再次总结说明:
(1)此处的General 和 Authentication,不是互斥的,而是基本的配置和 进一步的加密的配置
(2)而下面的mongo shell option,是当在General 和 Authentication之外,还需要加上什么参数,再去添加
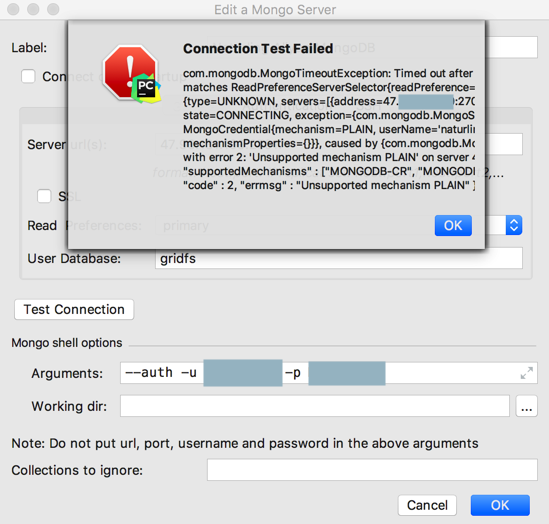
-》而之前自己此处就是:
把加密和验证的参数都放在了mongo shell option,而不是Authentication
从而导致登录失败的。
【后记】
后来参考到别人的代码:
def mongoDialogs():
username = urllib.parse.quote_plus(‘root’)
password = urllib.parse.quote_plus(‘xxx’)
# uri = "mongodb://%s:%s@localhost:32018/admin?authMechanism=SCRAM-SHA-1" % (username,password)
client = MongoClient(uri)
db = client.dialog
collection = db.dialog
for document in collection.find():
yield document
发现连接mongo时,没有指定要具体访问哪个数据库,但是只是验证了admin数据库
但是为何却可以接着去访问:
dialog(以及另外还有一个gridfs)数据库呢?
去自己用mongo所在服务器端:
[root@naturling-general-01 ~]# mongo –port 32018 -u root -p xxx –authenticationDatabase admin
登录进去,看到admin的users是:
> use admin
switched to db admin
> show users
{
"_id" : "admin.root",
"user" : "root",
"db" : "admin",
"roles" : [
{
"role" : "root",
"db" : "admin"
}
]
}
即
此处的root账号,角色role是root
所属db是admin数据库
而root的role,参考自己的整理内容:
对应着:
“Superuser Roles
root
角色:dbOwner,userAdmin,userAdminAnyDatabase
readWriteAnyDatabase, dbAdminAnyDatabase,
userAdminAnyDatabase,clusterAdmin”
即属于Superuser Roles,其中有个readWriteAnyDatabase好像是我要找的
-》
https://docs.mongodb.com/manual/reference/built-in-roles/#readWriteAnyDatabase
“readWriteAnyDatabase
Provides the same read and write privileges as readWrite on all databases except local and config. readWriteAnyDatabase also provides the listDatabases privilege action on the cluster.”
至此,就清楚了:
之前创建root用户时,(从属的db是admin),role设置的是root,表示:
针对于任意数据库(除了local和config)都有读写权限
-》所以才会出现此处的,用root用户登录进去
(但是没有限制要访问那个数据库,虽然auth验证了admin数据库)
然后可以随意连接具体普通的某个数据库,比如此处的dialog,gridfs等等,然后进去读写操作。
对应着,服务器端mongo终端中就可以随意操作:
mongo –port 32018 -u root -p xxx –authenticationDatabase admin
MongoDB shell version: 3.2.19
connecting to: 127.0.0.1:32018/test
> db.stats()
{
"db" : "test",
"collections" : 0,
"objects" : 0,
"avgObjSize" : 0,
"dataSize" : 0,
"storageSize" : 0,
"numExtents" : 0,
"indexes" : 0,
"indexSize" : 0,
"fileSize" : 0,
"ok" : 1
}
默认进去test,然后可以切换到任意数据库,进行读写操作(和查看状态操作,注:如果没有权限,则stats()都会报错的)
> show dbs
admin 0.000GB
dialog 0.272GB
gridfs 12.033GB
local 0.000GB
> use dialog
switched to db dialog
> db.stats()
{
"db" : "dialog",
"collections" : 1,
"objects" : 41750,
"avgObjSize" : 15885.976335329342,
"dataSize" : 663239512,
"storageSize" : 291450880,
"numExtents" : 0,
"indexes" : 1,
"indexSize" : 479232,
"ok" : 1
}
> db.dialog.find
db.dialog.find( db.dialog.findAndModify( db.dialog.findOne( db.dialog.findOneAndDelete( db.dialog.findOneAndReplace( db.dialog.findOneAndUpdate(
> db.dialog.find().count()
41750
> use gridfs
switched to db gridfs
> db.stats()
{
"db" : "gridfs",
"collections" : 2,
"objects" : 56849,
"avgObjSize" : 242133.6399584865,
"dataSize" : 13765055298,
"storageSize" : 12918734848,
"numExtents" : 0,
"indexes" : 4,
"indexSize" : 1462272,
"ok" : 1
}
对应着看到自己的root账号的信息:
> use admin
switched to db admin
> show users
{
"_id" : "admin.root",
"user" : "root",
"db" : "admin",
"roles" : [
{
"role" : "root",
"db" : "admin"
}
]
}
以及:
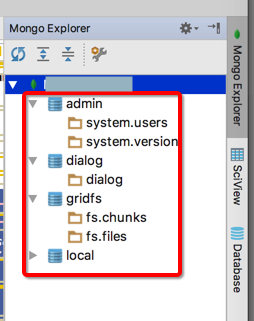
PyCharm中Mongo插件中,也可以实现类似效果:
在连接的General中不设置User Database:
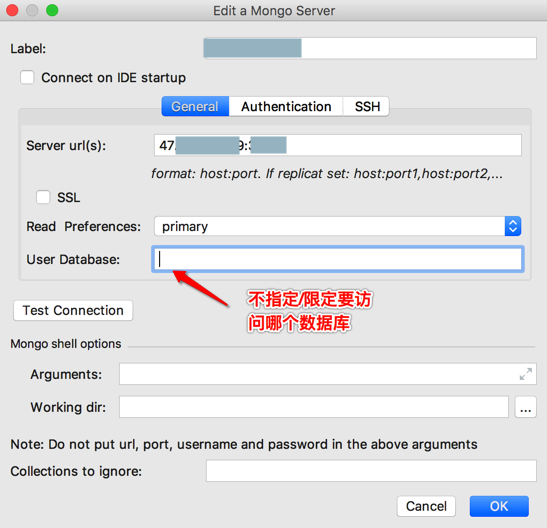
就是:
不限制此账号登录进去后,可以访问哪个数据库
虽然本身这个(root)账号需要验证,包括验证所从属于哪个数据库(相当于出生地)

然后也是可以正常连接进去,然后可以看到任意数据库的:
原因就是:
此处root账号是root的role,拥有readWriteAnyDatabase等很强的权限,所以有权操作这些普通数据库。
转载请注明:在路上 » 【已解决】PyCharm连接远程添加security的authorization的MongoDB出错:com.mongodb.MongoCommandExceptions: Command failed with error 13