折腾:
【记录】从fzhost搬家crifan.com到Linode的Atlanta的VPS
之后,发现内存占用有点高:
加载单个页面,每次都是占用大概30多M内存:
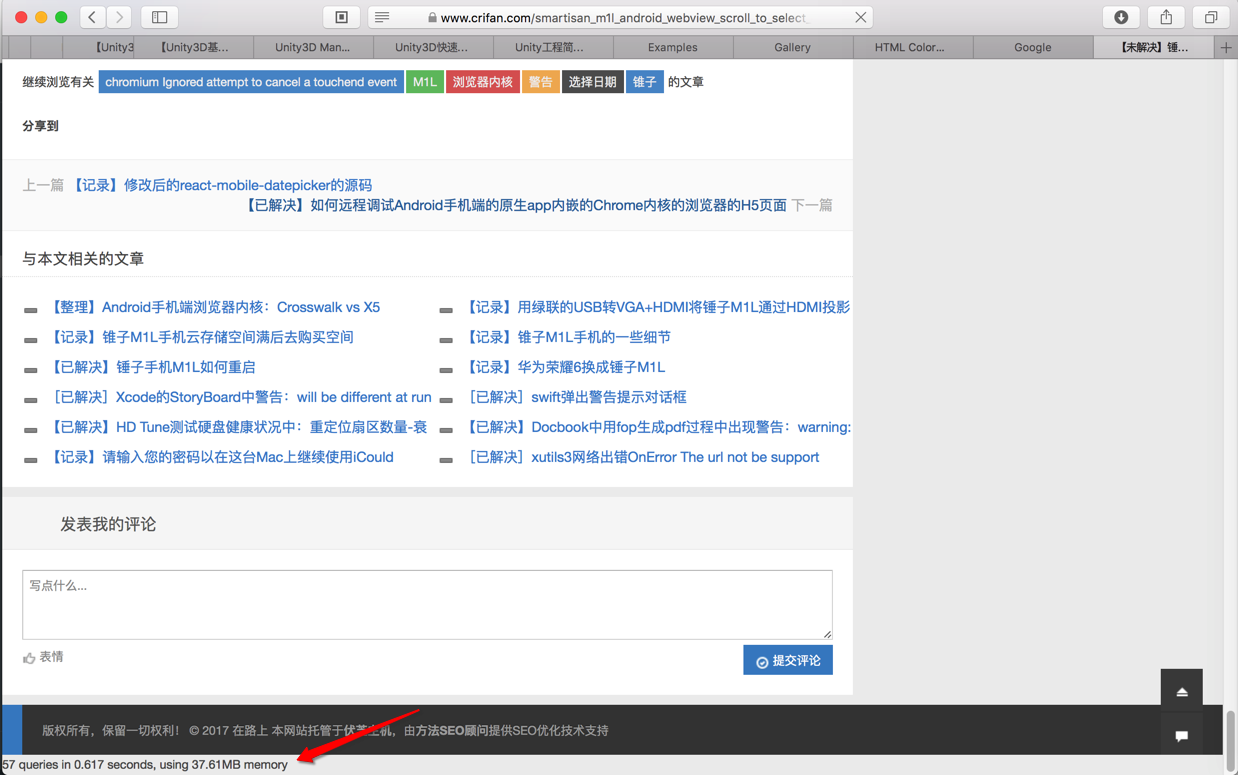
而之前朋友帮忙优化的结果都是10M左右,
所以需要自己去看看,能否继续优化,最好也优化为10M左右的内存占用。
其中,在安装lnmp时,注意到,可以安装各种支持缓存的插件,包括redis等等
而此处自己的Wordpress中,自己感觉是:
是之前朋友优化后的配置,但是是不是由于底层,lnmp系统中,缺少了对应的功能支持,比如redis,从而导致内存优化没有起效果?
还是先去看看,自己此处使用了哪些优化内存占用方面的插件
感觉和优化相关的有:
Accelerated Mobile Pages
Autoptimize
Redis Object Cache
WP Super Cache
最像的是:
Redis Object Cache
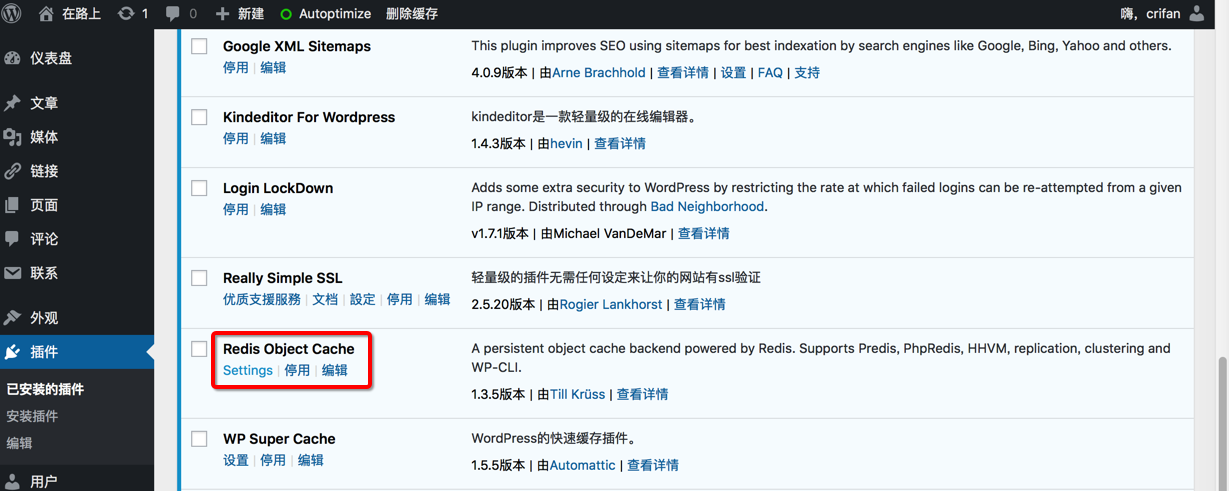
点击settings去看看
原来此处是关闭了,点击开启:
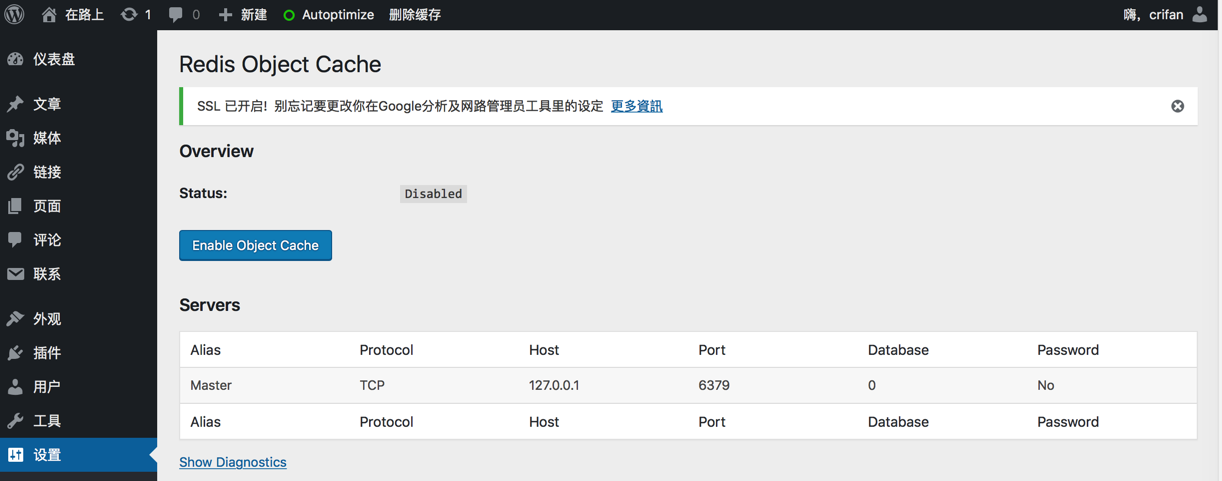
结果没有开启成功:
Status: | Not Connected |
Client: | Predis |
点击show diagnostic,显示详情:
PHP Version: 5.6.31 Multisite: No Redis: Not Found Predis: 1.1.1 Status: Not Connected Client: Predis WP_CACHE_KEY_SALT: "" Drop-in: Valid Global Prefix: "wp_" Blog Prefix: "wp_" Global Groups: ["blog-details","blog-id-cache","blog-lookup","global-posts","networks","rss","sites","site-details","site-lookup","site-options","site-transient","users","useremail","userlogins","usermeta","user_meta","userslugs"] Ignored Groups: ["counts","plugins","blog-details","blog-id-cache","blog-lookup","global-posts","networks","rss","sites","site-details","site-lookup","site-options","site-transient","users","useremail","userlogins","usermeta","user_meta","userslugs","themes"] |
果然是redis没有开启。
所以,先去lnmp去安装redis
lnmp redis
LNMP 1.2缓存加速类扩展(xcache/Redis/memcached/eAccelerator)、imageMagick、ionCube安装教程 – LNMP一键安装包
去看看脚本支持哪些功能:
[root@crifan lnmp1.4]# pwd /root/lnmp1.4 [root@crifan lnmp1.4]# ll total 92 -rwxr-xr-x 1 root root 8647 Jun 1 14:06 addons.sh -rw-r–r– 1 root root 11290 Jun 1 14:06 ChangeLog drwxr-xr-x 3 root root 4096 Aug 23 21:47 conf drwxr-xr-x 2 root root 4096 Aug 19 11:28 include drwxr-xr-x 2 root root 4096 May 29 08:43 init.d -rwxr-xr-x 1 root root 5777 Aug 1 22:12 install.sh -rw-r–r– 1 root root 209 Jul 3 2016 License -rwxr-xr-x 1 root root 313 Sep 4 21:23 lnmp.conf -rwxr-xr-x 1 root root 4806 Jun 1 14:06 pureftpd.sh -rw-r–r– 1 root root 6137 Jun 1 14:08 README drwxr-xr-x 6 root root 4096 Sep 5 10:31 src drwxr-xr-x 2 root root 4096 Apr 1 09:49 tools -rwxr-xr-x 1 root root 6460 Jun 1 14:06 uninstall.sh -rwxr-xr-x 1 root root 2567 Jun 12 21:27 upgrade1.x-1.4.sh -rwxr-xr-x 1 root root 2777 Jun 1 14:06 upgrade.sh [root@crifan lnmp1.4]# ./addons.sh help +———————————————————————–+ | Addons script for LNMP V1.4, Written by Licess | +———————————————————————–+ | A tool to Install cache,optimizer,accelerator…addons for LNMP | +———————————————————————–+ | For more information please visit https://lnmp.org | +———————————————————————–+ ##### cache / optimizer / accelerator ##### 1: eAccelerator 2: XCache 3: Memcached 4: opcache 5: Redis 6: apcu ##### Image Processing ##### 7: imageMagick ##### encryption/decryption utility for PHP ##### 8: ionCube Loader exit: Exit current script ##################################################### Enter your choice (1, 2, 3, 4, 5, 6, 7, 8 or exit): exit [root@crifan lnmp1.4]# |
是有redis,去安装:
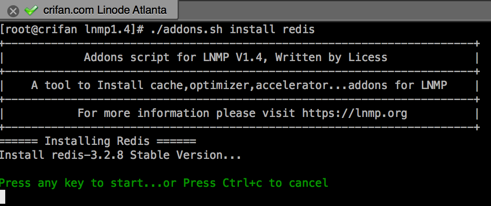
[root@crifan lnmp1.4]# ./addons.sh install redis +———————————————————————–+ | Addons script for LNMP V1.4, Written by Licess | +———————————————————————–+ | A tool to Install cache,optimizer,accelerator…addons for LNMP | +———————————————————————–+ | For more information please visit https://lnmp.org | +———————————————————————–+ ====== Installing Redis ====== Install redis-3.2.8 Stable Version… Press any key to start…or Press Ctrl+c to cancel |
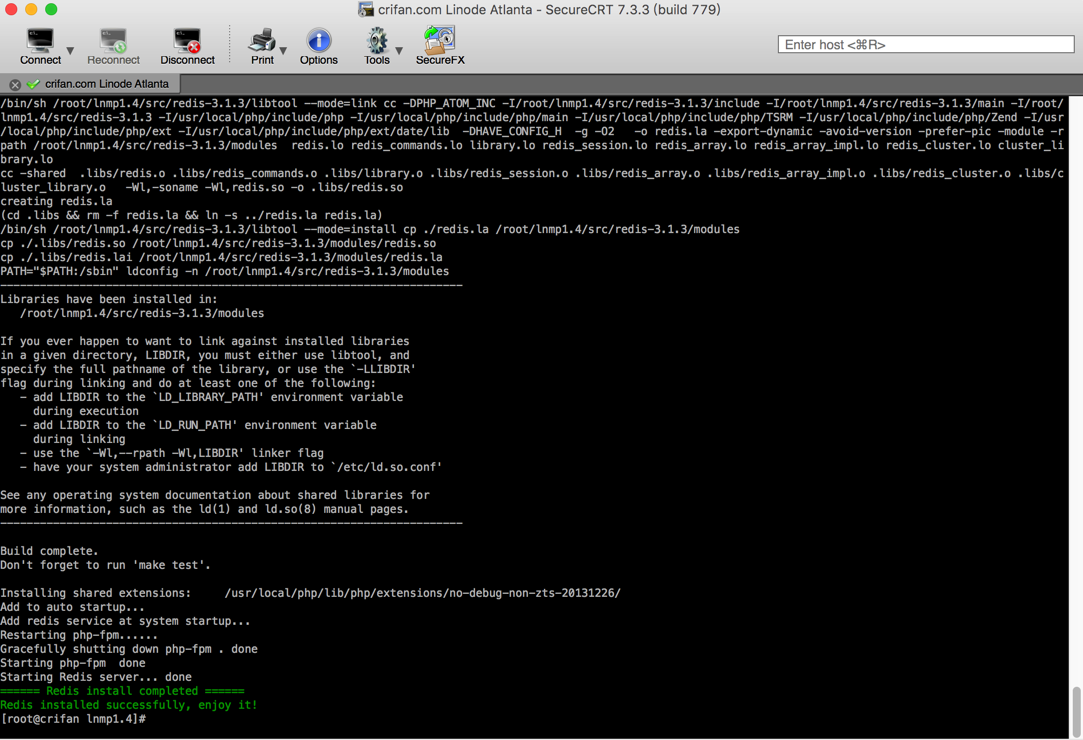
稍等一会然后就安装完成了
| <div–<——————————————————————– Libraries have been installed in: /root/lnmp1.4/src/redis-3.1.3/modules If you ever happen to want to link against installed libraries in a given directory, LIBDIR, you must either use libtool, and specify the full pathname of the library, or use the `-LLIBDIR’ flag during linking and do at least one of the following: – add LIBDIR to the `LD_LIBRARY_PATH’ environment variable during execution – add LIBDIR to the `LD_RUN_PATH’ environment variable during linking – use the `-Wl,–rpath -Wl,LIBDIR’ linker flag – have your system administrator add LIBDIR to `/etc/ld.so.conf’ See any operating system documentation about shared libraries for more information, such as the ld(1) and ld.so(8) manual pages. <div–<——————————————————————– Build complete. Don’t forget to run ‘make test’. Installing shared extensions: /usr/local/php/lib/php/extensions/no-debug-non-zts-20131226/ Add to auto startup… Add redis service at system startup… Restarting php-fpm…… Gracefully shutting down php-fpm . done Starting php-fpm done Starting Redis server… done ====== Redis install completed ====== Redis installed successfully, enjoy it! [root@crifan lnmp1.4]# |
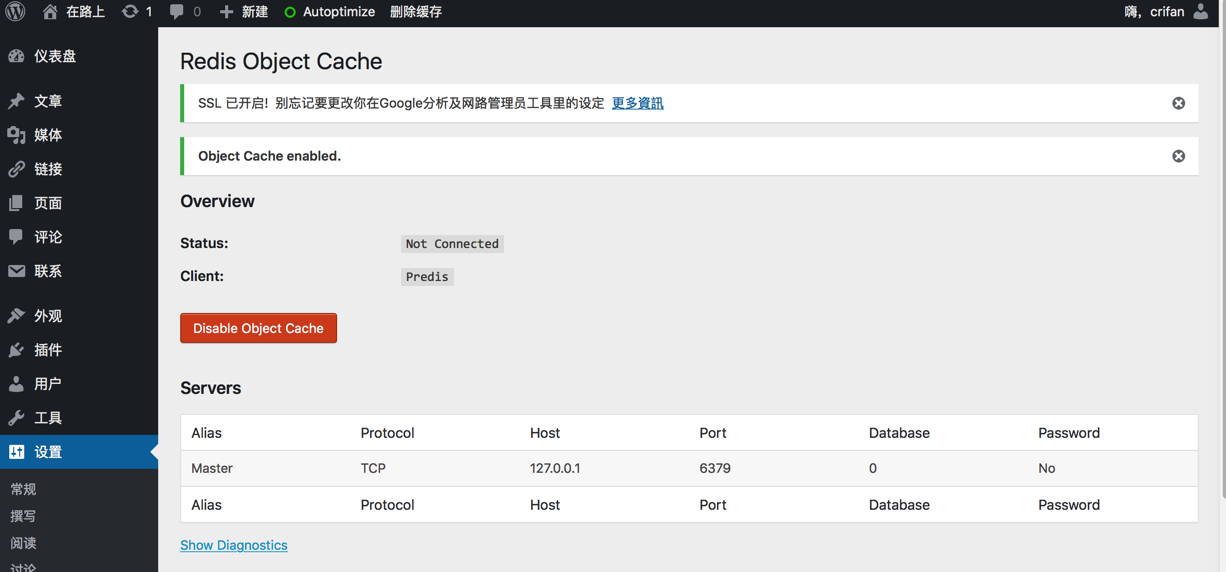
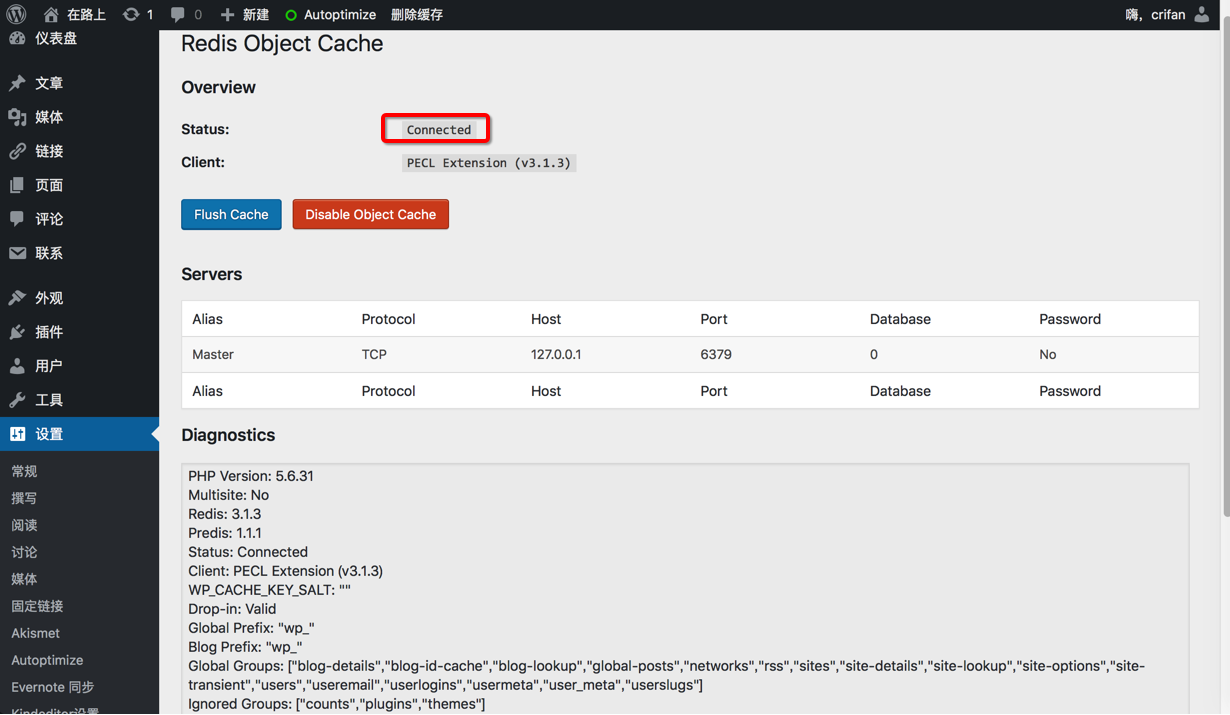
然后回到wordpress插件中的Redis Object Cache,再去重新启用试试
刷新一下页面,就可以看到已经启用连接上了redis了:
然后再去看看页面加载速度如何。
目前好像还是30多M等内存占用。
或许需要等过一段时间,比如过几天,再看看,内存占用是否降低了。
然后再去点击:
WP Super Cache
的设置去看看:
看了会各种设置:

貌似也没什么问题。
所以暂时不去管WP Super Cache插件了,默认是正常工作的。
不过,貌似去刷新页面的内存占用率,之前记得都是90%多的
开了Redis后,貌似立刻降低到70%左右了:
好像是redis起的效果。
有待后续长期观察,再去看看效果。
lnmp WordPress 内存占用优化
» 小内存 VPS 优化建议 (LNMP+Wordpress 环境) Wow! Ubuntu
lnmp全面优化nginx+mysql+php 加速你的wordpress – wordpress公园
lnmp建站环境全面优化nginx+mysql+php_空间域名
小内存VPS优化 – 如何搭建个人网站 – KeenWon | 做有趣的事
linux下内存占用过高解决办法-lnmp内存优化 | 陋室博客
抽空再参考上面几个帖子去优化设置。
不过发现上述的很多配置,包括:
worker_processes改为当前CPU内核数等等,其实此处已经都是更好的设置为auto了:
[root@crifan lnmp1.4]# cat /usr/local/nginx/conf/nginx.conf user www www; worker_processes auto; error_log /home/wwwlogs/nginx_error.log crit; pid /usr/local/nginx/logs/nginx.pid; #Specifies the value for maximum file descriptors that can be opened by this process. worker_rlimit_nofile 51200; events { use epoll; worker_connections 51200; multi_accept on; } 。。。 |
所以这类设置,都不用我操心,感觉已经是很好了。
更主要的是:
之前的fzhost中的nginx的配置和此处的linode中nginx的配置,都是一样的,
而之前是别人优化好的,加载页面只消耗10M内存的配置,所以此处无无须再改。
肯定是别处哪里的配置,没有设置好。
需要我继续去找找。
不过也有可能是mysql等其他方面的优化,所以还是需要自己去对比,找到fzhost和当前linode中的配置的区别。
【后记 2017-09-09】
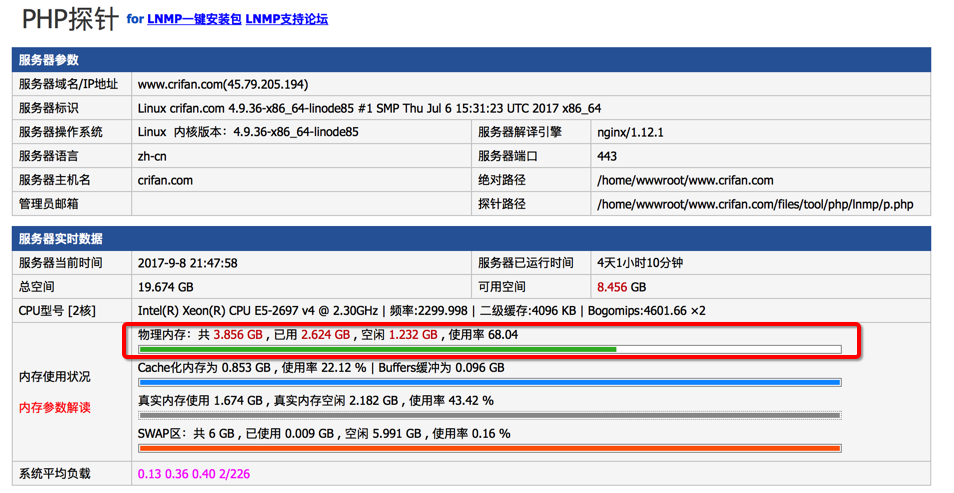
去看看探针中内存占用如何
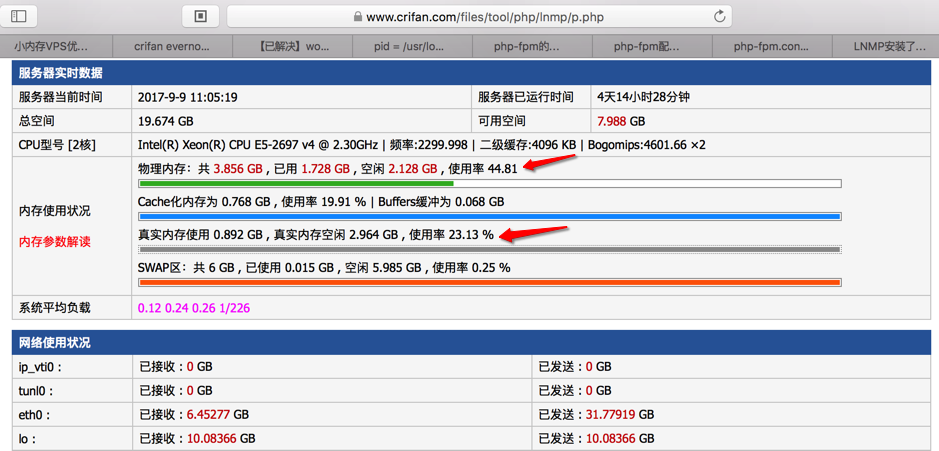
效果和昨晚一样,很明显,内存占用只有50%左右了。
-》至少短时间内,不担心内存不够用了。
不过,也注意到了,或许可能是:当前网站访问用户数只有50左右(平时高峰期是100多的)
所以内存占用才一半呢?
所以还是要等高峰期再看看内存占用的比例是否还是50%左右才知道redis效果如何。
【记录】尝试Linode中的crifan.com的LNMP中去优化MySQL去优化内存占用
另外:
【记录】尝试通过php-fpm去优化Linode中LNMP的wordpress网站crifan.com页面加载的内存占用
但是都还是没成功,单页面加载还是消耗30M内存,还是没有降低到10M。
以后有空再说。
朋友回复了说是:
lnmp安装opcache即可
搜:
lnmp opcache
opcache 作用
LNMP 1.2缓存加速类扩展(xcache/Redis/memcached/eAccelerator)、imageMagick、ionCube安装教程 – LNMP一键安装包
“7、opcache
此脚本是用来安装opcache的,是 Zend 开发的闭源但可以免费使用的 PHP 优化加速组件。LNMP 1.2下安装的PHP 5.5或更高版本的PHP不需要额外安装OPcache,默认已经安装上。
1.3上默认已安装但未启用执行:./addons.sh install opcache 进行开启。
安装
进入lnmp解压后的目录,执行:./addons.sh install opcache
Opcache和eAccelerator是冲突的,脚本会卸载eAccelerator后再安装Opcache,回车确认后就会自动安装opcache。
卸载
执行:./addons.sh uninstall opcache”
LNMP安装了哪些软件?安装目录在哪? – LNMP一键安装包
“
- 可选5,opcache,执行:opcache.sh安装。http://yourIP/ocp.php 进行管理。Zend Opcache与eaccelerator相冲突,需卸载eaccelerator。
”
去看了下,此处
phpinfo.php
中的确没有开启Zend OPCache
但是PHP的Configure Command中有:
‘–enable-opcache’
说明编译时编译了该功能,只是默认没有开启而已。
不用自己去编辑配置文件去开启对应的库,而是去用脚本帮我们去做:
[root@crifan lnmp1.4]# ./addons.sh help +———————————————————————–+ | Addons script for LNMP V1.4, Written by Licess | +———————————————————————–+ | A tool to Install cache,optimizer,accelerator…addons for LNMP | +———————————————————————–+ | For more information please visit https://lnmp.org | +———————————————————————–+ ##### cache / optimizer / accelerator ##### 1: eAccelerator 2: XCache 3: Memcached 4: opcache 5: Redis 6: apcu ##### Image Processing ##### 7: imageMagick ##### encryption/decryption utility for PHP ##### 8: ionCube Loader exit: Exit current script ##################################################### Enter your choice (1, 2, 3, 4, 5, 6, 7, 8 or exit): exit |
然后去安装:
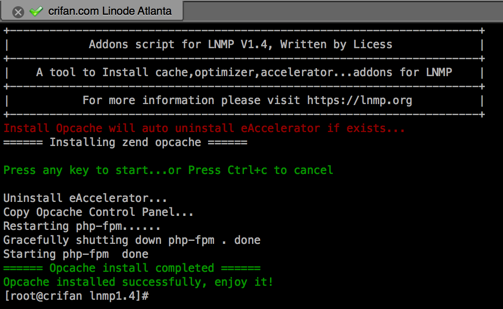
./addons.sh install opcache
+———————————————————————–+ | Addons script for LNMP V1.4, Written by Licess | +———————————————————————–+ | A tool to Install cache,optimizer,accelerator…addons for LNMP | +———————————————————————–+ | For more information please visit https://lnmp.org | +———————————————————————–+ Install Opcache will auto uninstall eAccelerator if exists… ====== Installing zend opcache ====== Press any key to start…or Press Ctrl+c to cancel Uninstall eAccelerator… Copy Opcache Control Panel… Restarting php-fpm…… Gracefully shutting down php-fpm . done Starting php-fpm done ====== Opcache install completed ====== Opcache installed successfully, enjoy it! |
让去看phpinfo.php的结果:
就搜到更多的opcache的东西了:
Zend OPcache
。。。 |

再去重启lnmp:
lnmp restart
先去看看:
中是否有那个ocp.php:
果然是有的:
[root@crifan crifan]# pwd /home/wwwroot/crifan [root@crifan crifan]# ll total 24 drwxr-xr-x 3 root root 4096 Sep 5 11:09 lnmp -rw-r–r– 1 root root 20256 Sep 10 12:10 ocp.php |
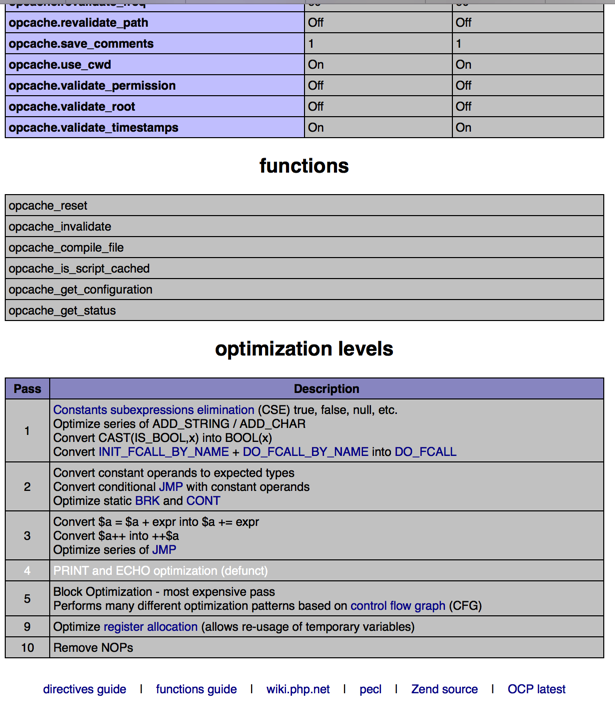
进入看看:
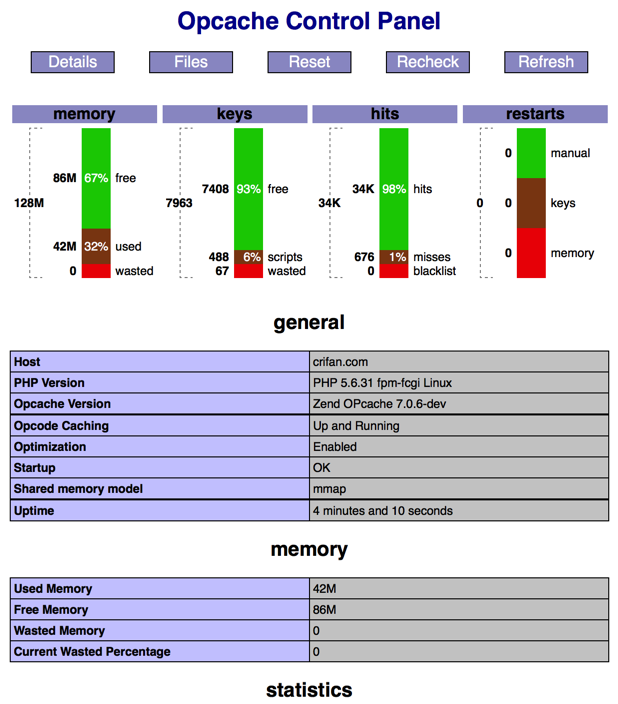
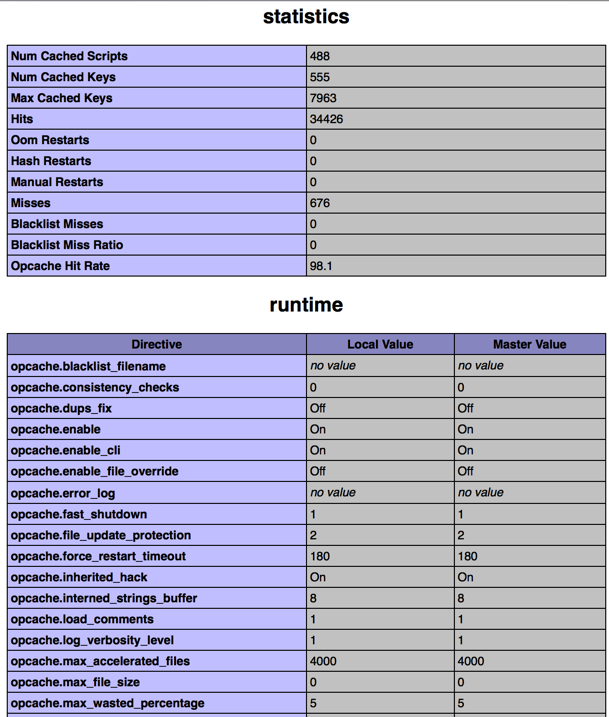
其中重要参数的解释:
“Cache hits就是缓存命中次数,你刷新一次就会增加一次。那么缓存如何被清理呢?依然通过配置文件配置,具体项目就是opcache.force_restart_timeout,通过指定该时间,在多少时间内容该缓存失效。”
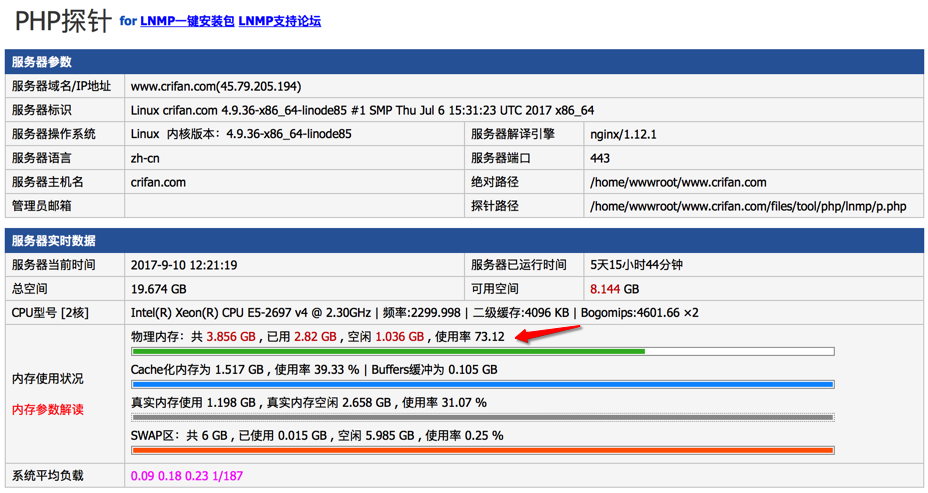
然后再去看看页面加载内存占用如何
果然,直接就变成10M多了:
效果果然好,😄。
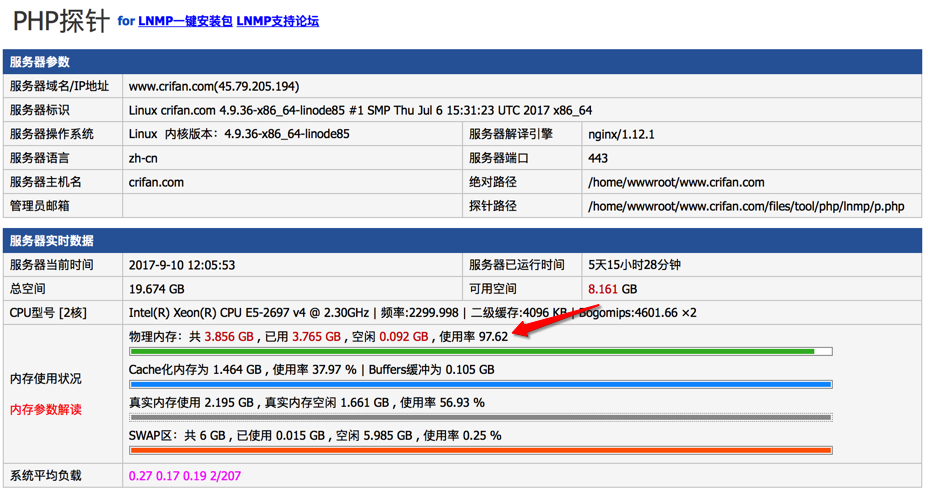
而之前探针中的内存占用往往都是90%多:
现在好像降低到70%多了:
另外,参考:
再去比较之前fzhost中的php.in和当前自己linode中是否一样:
结果发现,除了一个scandir,其他都一样:
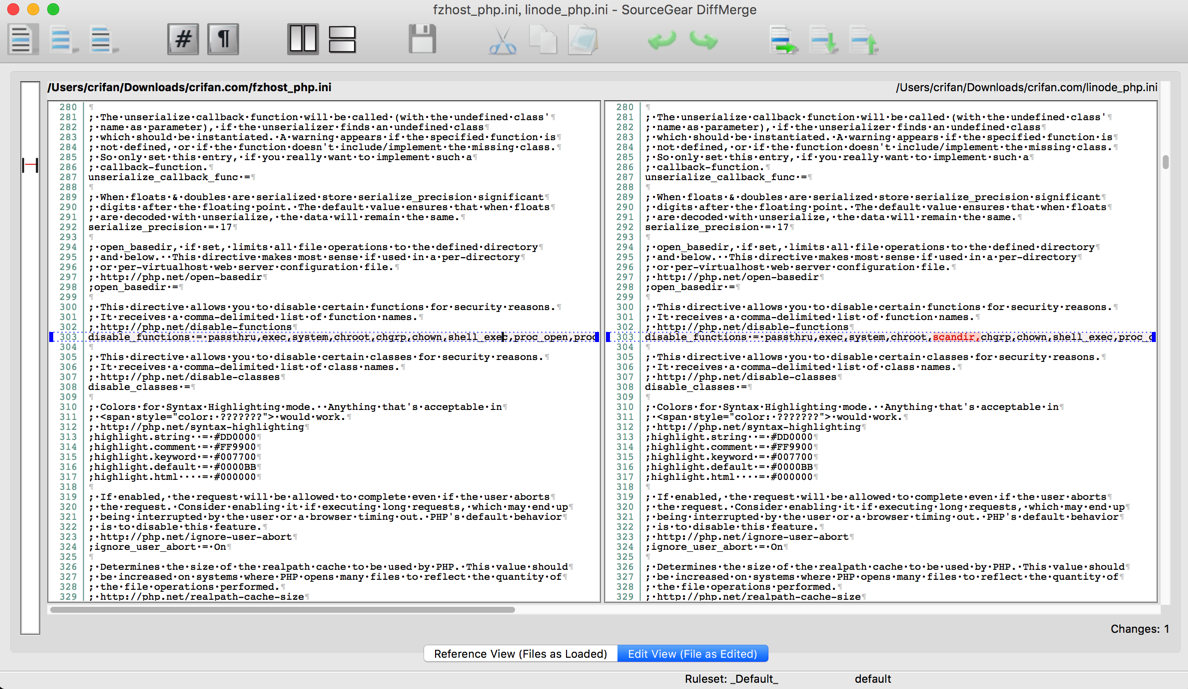
所以无需操心相关配置了。
(本来以为是不是需要调整opcache.memory_consumption变得大点会好点呢)
不论如何,总之是:
【总结】
通过lnmp中:
./addons.sh install opcache
即可安装(Zend的插件)opcache,从而降低磁盘读取,降低页面加载时的内存占用
从之前的30多M,降低到10多M,效果明显。
注:其实lnmp 1.4此处安装PHP是5.6.31,默认已经加了编译参数–enable-opcache:去加了opcache功能了,但是默认没有开启而已。
而lnmp中去install opcache,估计只是去更新php.ini中配置,去开启这个插件而已。